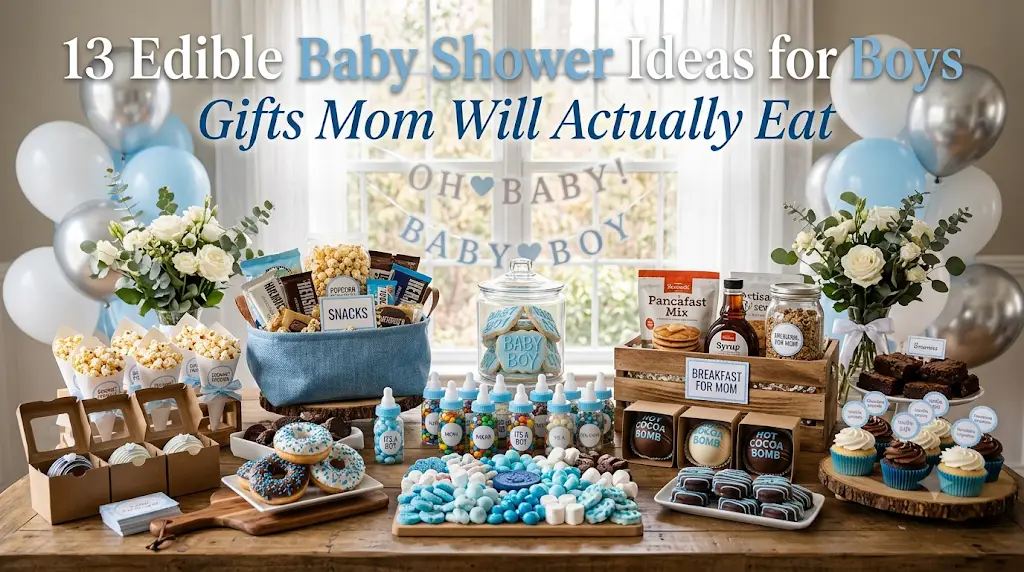
There are plenty of baby shower gifts that end up tucked away in a closet, but edible gifts are a different story. As a mom and someone who’s helped plan more baby showers than I can count, I’ve noticed that delicious treats always disappear before the decorations come down. A thoughtful edible gift feels personal, useful, and comforting during those busy weeks before the baby arrives.
For a baby boy shower, I love combining cute blue-themed details with foods the mom-to-be can actually enjoy later. Whether you’re putting together a gift table, planning favors, or surprising the guest of honor with something handmade, these edible ideas are practical without feeling boring. They’re easy to customize, fit almost any budget, and always get people talking.
1. Blue Snack Basket Packed with Mom’s Favorite Treats
The Concept:
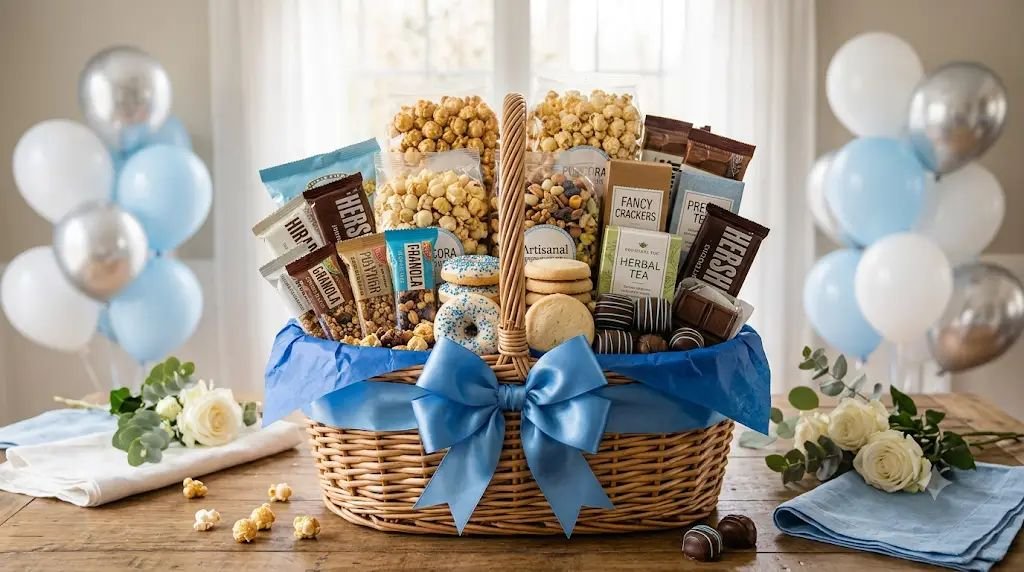
This is one of my favorite edible gifts because it feels thoughtful instead of generic. Rather than filling a basket with random blue candies, I like choosing snacks the mom-to-be genuinely enjoys. It becomes a care package she can keep nearby after the baby arrives for those moments when she finally gets a chance to grab a quick bite.
Estimated Budget:
Low to Medium: $30–$60
Materials Needed:
- Medium wicker basket or decorative storage bin
- Blue tissue paper
- Blue ribbon
- Popcorn bags
- Granola bars
- Trail mix
- Mixed nuts (if suitable)
- Chocolate-covered pretzels
- Crackers
- Cookies
- Herbal tea bags
- Hot chocolate packets
- Fruit snacks
- Beef jerky (optional)
- Blue gummy candy
- Personalized gift tag
- Clear cellophane wrap
- Tape
- Scissors
How to Set It Up (Step-by-Step):
- Start by choosing a sturdy basket that can be reused after the shower. I usually pick a woven basket with handles because it later becomes useful for storing diapers, baby books, or blankets.
- Line the inside with several sheets of blue tissue paper, letting some edges stick out naturally. This makes the basket look full even before adding the snacks.
- Think about variety instead of quantity. Include sweet, salty, crunchy, and healthy options so the mom has different choices depending on her mood.
- Place the tallest items first toward the back. Tea boxes, popcorn bags, or larger snack packages help create height.
- Arrange medium-sized snacks like granola bars, crackers, and trail mix in the center, angling them slightly so every package is visible.
- Fill the front with smaller treats such as chocolates, fruit snacks, and cookies. This creates a full display without hiding anything behind larger packages.
- If you’re including homemade cookies or brownies, package them individually in clear food-safe bags before placing them inside the basket. This keeps everything fresh and makes sharing easy.
- Tuck small pieces of blue tissue paper between empty spaces. This simple trick keeps everything from shifting during transport.
- Wrap the entire basket with clear cellophane. Pull the wrap tightly at the top so it looks polished rather than loose.
- Tie a wide blue ribbon into a large bow. I like making the bow slightly oversized because it instantly makes the basket feel more like a special gift.
- Add a handwritten tag with a sweet message such as:
“Late-night snack supplies for the sweetest new mama and her little boy.” - Store the basket somewhere cool until the shower begins so chocolate and other treats stay in perfect condition.
- Place the finished basket near the gift table where guests can easily admire it before it’s opened. It also doubles as part of the party décor.
2. Baby Bottle Candy Gift Box
The Concept:
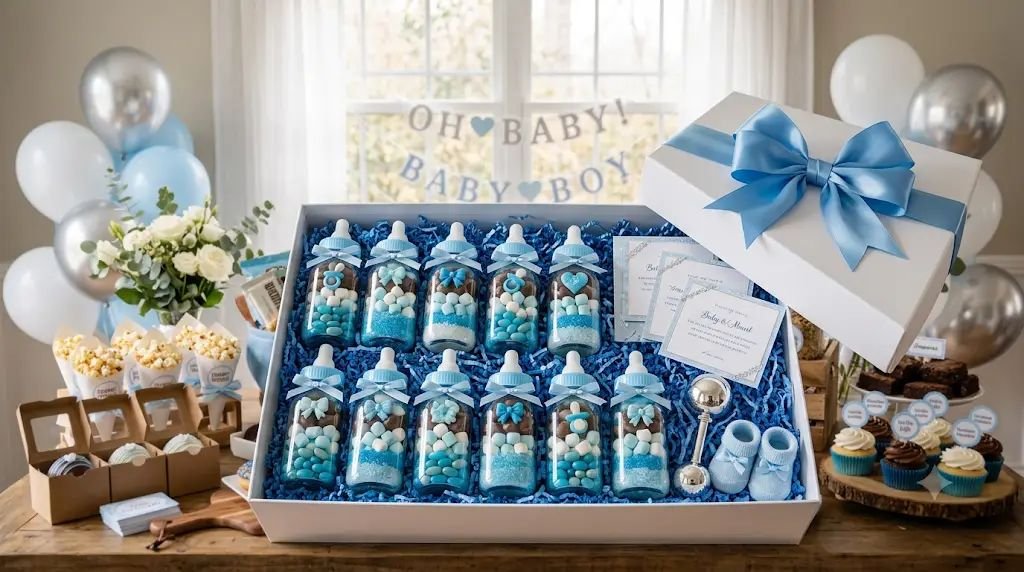
Every time I make these, guests smile before they even realize they’re edible. Clear baby bottles filled with colorful candy look adorable on the dessert table, and they’re easy to personalize with blue treats for a baby boy celebration.
Estimated Budget:
Low: $20–$45
Materials Needed:
- Large clear plastic baby bottles (new and food-safe)
- Blue jelly beans
- Blue chocolate candies
- Yogurt-covered raisins
- Mini marshmallows
- Wrapped chocolate kisses
- Decorative gift box
- Blue shredded paper filler
- Blue ribbon
- Personalized labels
- Gift tags
- Clear food-safe bags (optional)
- Tape
- Scissors
How to Set It Up (Step-by-Step):
- Wash and completely dry every baby bottle before filling it. Even if the bottles are brand new, I always give them a quick rinse to remove dust from packaging.
- Decide on a candy color palette. Blue, white, silver, and light gray work beautifully together for a baby boy theme without looking overwhelming.
- Start filling each bottle in layers rather than mixing everything together. Layered colors create a much prettier display when viewed through the clear plastic.
- Pour blue jelly beans into the bottom first, creating a solid foundation that holds the bottle upright.
- Add a layer of mini marshmallows to create contrast. Their bright white color makes the blue candies stand out even more.
- Continue alternating candies until the bottle is nearly full. Leave about one inch of space at the top so the lid closes securely without crushing anything.
- Twist the bottle cap on tightly. Give each bottle a gentle shake to make sure nothing spills.
- Arrange blue shredded paper inside a decorative gift box. This cushions the bottles and keeps them from rolling around.
- Place the filled bottles upright inside the box. If you’re giving several bottles, stagger the heights slightly by adding extra filler underneath some of them.
- Tie a blue ribbon around each bottle’s neck for an extra decorative touch.
- Create a personalized label with a fun saying like:
“Fuel for the New Mom” or
“Sweet Moments Ahead.” - If you want to make the gift feel even more special, tuck a handwritten note beneath the bottles telling the mom to enjoy the treats during late-night feedings or relaxing moments after the baby arrives.
- Display the completed gift box near the dessert table or gift station. The bottles often become conversation starters because guests love realizing they’re filled entirely with candy instead of baby supplies.
- After the shower, the bottles can even be washed and reused for party decorations, craft storage, or fun keepsakes, making this edible gift feel useful long after every piece of candy has been enjoyed.
3. Homemade Cookie Jar Gift with Blue Baking Mix
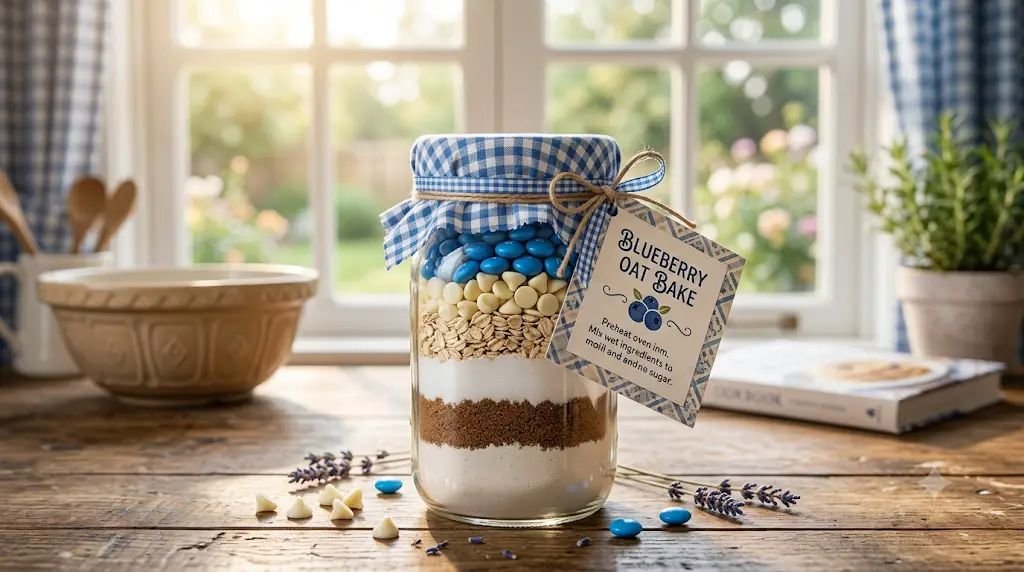
The Concept:
I absolutely love giving cookie jars because they feel homemade without requiring the mom-to-be to eat everything immediately. She can bake them whenever she has family visiting after the baby arrives, or someone can bake them for her while she’s recovering. Every time I’ve made one, people ask how I layered everything so neatly.
Estimated Budget:
Low to Medium: $25–$50
Materials Needed:
- 1 large glass mason jar (1–2 quart size)
- All-purpose flour
- Baking soda
- Baking powder
- Salt
- Brown sugar
- White sugar
- Blue chocolate candies
- White chocolate chips
- Rolled oats (optional)
- Chopped pecans or walnuts (optional)
- Decorative fabric for the jar lid
- Blue ribbon or twine
- Printable recipe card
- Personalized gift tag
- Funnel
- Measuring cups
- Spoon
How to Set It Up (Step-by-Step):
- Wash the mason jar with warm, soapy water and dry it completely. Any moisture left inside can affect the dry ingredients, so I usually let it air dry for at least an hour.
- Measure every ingredient before you begin layering. Having everything ready keeps the layers clean and prevents accidental spills.
- Use a funnel to pour the flour into the bottom of the jar. Gently tap the jar on the counter after each layer so it settles evenly.
- Mix the baking soda, baking powder, and salt together before adding them as the next layer. This keeps the leavening ingredients evenly distributed once the cookies are mixed later.
- Carefully spoon the brown sugar into the jar, pressing it down lightly with the back of a spoon to create a straight, even layer.
- Add the white sugar next. The contrast between the white and brown layers gives the jar that classic bakery-style look.
- If you’re using rolled oats, pour them in now. They add texture to the cookies and create another attractive layer.
- Add white chocolate chips followed by blue chocolate candies. These colorful layers instantly give the mix a baby boy theme without looking overly decorated.
- Sprinkle chopped nuts on top if the recipient enjoys them. If you’re unsure about allergies, simply leave them out.
- Fill the jar almost to the top while leaving about half an inch of empty space so the lid fits comfortably.
- Cut a circle of blue gingham or baby-themed fabric slightly larger than the lid. Place it over the lid before screwing on the metal ring for a charming homemade touch.
- Print or handwrite a complete cookie recipe explaining exactly what wet ingredients to add, the oven temperature, baking time, and expected yield. I always include easy-to-follow instructions because nobody wants to guess later.
- Tie the recipe card around the neck of the jar with blue ribbon or rustic twine.
- Add a small gift tag that says something sweet like:
“Fresh cookies whenever you need a little pick-me-up.” - Display the cookie jar standing upright on the gift table. Its layered ingredients make it part gift and part decoration, and guests almost always stop to admire it before the shower begins.
4. Breakfast-in-Bed Brunch Gift Crate
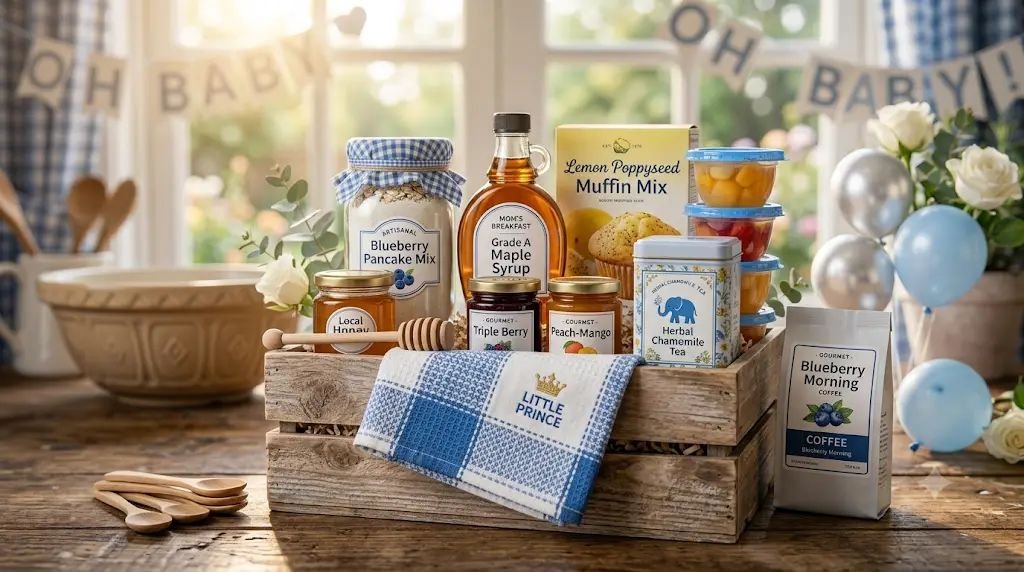
The Concept:
After helping several new moms, I’ve learned that breakfast often gets skipped during those first few weeks with a newborn. That’s why I love this edible gift. Instead of candy alone, it gives the mom ingredients for a relaxing breakfast whenever she has a quiet morning—or whenever someone wants to spoil her with breakfast in bed.
Estimated Budget:
Medium: $40–$75
Materials Needed:
- Wooden crate or decorative storage box
- Pancake mix
- Waffle mix (optional)
- Pure maple syrup
- Local honey
- Gourmet jam or fruit preserves
- Muffin mix
- Biscuit mix
- Coffee
- Herbal tea
- Hot chocolate packets
- Shelf-stable fruit cups
- Blue kitchen towel
- Wooden honey dipper
- Small wooden spoon
- Blue ribbon
- Gift tag
- Tissue paper or shredded paper filler
How to Set It Up (Step-by-Step):
- Choose a sturdy wooden crate that can later be used to organize baby supplies, books, diapers, or toys. I love gifts that stay useful after the food is gone.
- Line the bottom of the crate with crumpled blue tissue paper or shredded paper filler to create a soft base.
- Fold a soft blue kitchen towel neatly and place it across one corner of the crate. Besides looking pretty, it becomes something practical the mom can use every day.
- Position the pancake mix and waffle mix toward the back since they’re usually the tallest items.
- Arrange the maple syrup and honey bottles near the center, making sure they’re standing securely. If either bottle is glass, wrap a little tissue paper around the base for extra protection.
- Add jars of jam or preserves beside the syrup. Strawberry, blueberry, and raspberry flavors all fit beautifully with a baby shower color scheme.
- Place the muffin mix and biscuit mix in front of the larger boxes so each label remains visible.
- Fill any remaining spaces with coffee packets, herbal teas, hot chocolate, and shelf-stable fruit cups. These smaller items help create a full, balanced display.
- Slide the wooden honey dipper and spoon into one side of the crate. These little details make the gift feel thoughtfully assembled instead of simply packed.
- Step back and look at the arrangement from several angles. If one side looks heavier than the other, move items around until the crate feels visually balanced.
- Tie a wide blue ribbon around the entire crate. I usually secure it underneath with clear tape before tying a large bow on top so it stays neat during transport.
- Attach a handwritten tag with a message such as:
“Wishing you slow mornings, warm breakfasts, and lots of baby cuddles.” - Keep the finished crate in a cool, dry place until it’s time for the shower. If you’ve included specialty coffee or fresh bakery items, add those on the morning of the event so they stay at their best.
- Place the crate near the entrance or gift table where guests can see the variety of breakfast treats. It’s one of those gifts that often inspires others because it feels both beautiful and genuinely helpful.
- After the shower, encourage the mom-to-be to keep the crate stocked with easy breakfast foods. From my experience, having quick, comforting options within reach makes those early newborn mornings just a little bit easier.
5. Blue Chocolate Smash Heart Gender Reveal Gift
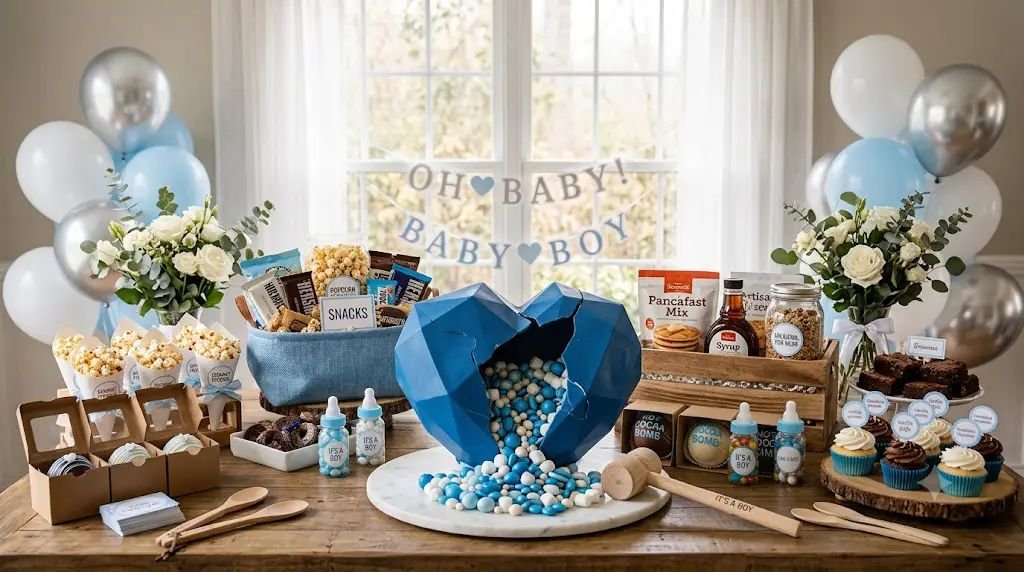
The Concept:
This is one of the most exciting edible gender reveal ideas I’ve helped put together. Instead of opening a wrapped gift, the parents gently break a large chocolate heart to reveal blue candies hidden inside. It creates a fun surprise, makes for amazing photos, and everyone gets to enjoy the chocolate afterward.
Estimated Budget:
Medium: $35–$70
Materials Needed:
- Large silicone heart mold
- Blue candy melts or white chocolate with blue food coloring
- Assorted blue candies (M&M’s, jelly beans, chocolate pearls)
- Mini marshmallows
- Wrapped chocolates
- Small wooden mallet
- Food-safe gold or blue edible glitter (optional)
- Decorative cake board
- Clear gift box
- Blue ribbon
- Personalized gift tag
- Parchment paper
How to Set It Up (Step-by-Step):
- Wash and dry the silicone mold thoroughly before using it. Even a small amount of moisture can affect how the chocolate sets.
- Melt the candy melts or chocolate according to the package directions. Stir until completely smooth with no lumps remaining.
- Spoon a generous layer of melted chocolate into the heart mold, using the back of a spoon or pastry brush to coat the sides evenly. The shell should be thick enough that it won’t crack while being removed from the mold.
- Place the mold in the refrigerator for about 15–20 minutes until firm.
- Add a second layer of chocolate inside the mold for extra strength. Chill again until completely hardened.
- Carefully remove the chocolate heart from the mold. Handle it with clean, dry hands to avoid fingerprints or melting.
- Fill one half of the heart with blue candies, mini marshmallows, and individually wrapped chocolates. I like mixing different textures so every handful is a little surprise.
- Warm a small plate for a few seconds, then gently press the empty chocolate half onto it. This slightly melts the edge.
- Immediately place it on top of the filled half and press lightly to seal both pieces together.
- If there’s a visible seam, pipe or spread a little melted chocolate over it and smooth it with a small spatula.
- Decorate the outside with a drizzle of contrasting white chocolate or sprinkle on edible glitter for a festive finish.
- Place the finished heart on a decorative cake board lined with parchment paper.
- Put the wooden mallet beside the heart and tie both together with a blue ribbon if desired.
- Carefully package everything inside a clear gift box so guests can admire the chocolate heart before the reveal.
- During the party, gather everyone around a sturdy table. Ask the parents to gently tap the heart with the mallet until it breaks open and the blue candies spill out. The excitement, laughter, and photos from this moment are always worth the effort.
6. Cupcake Reveal Gift Box
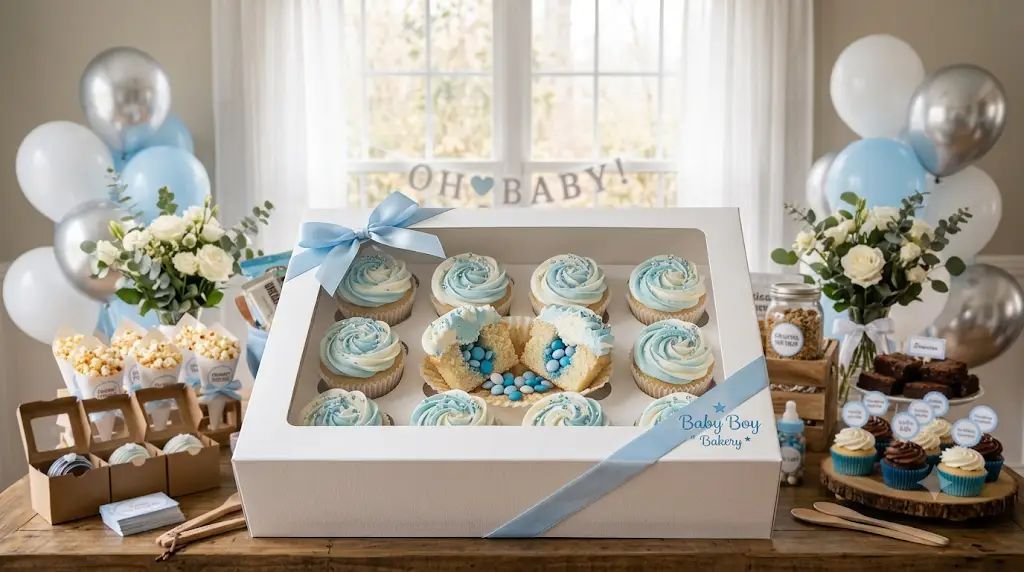
The Concept:
If there’s one edible reveal that never disappoints, it’s cupcakes with a hidden blue center. From the outside, they look like elegant frosted cupcakes, but the surprise comes with the very first bite. I love this idea because every guest gets to be part of the reveal at the same time.
Estimated Budget:
Low to Medium: $30–$60
Materials Needed:
- One dozen vanilla cupcakes
- Blue buttercream frosting
- White buttercream frosting
- Blue sprinkles
- Blue candy-coated chocolates
- Cupcake corer or small knife
- Piping bags
- Decorative cupcake liners
- Cupcake gift box
- Ribbon
- Gift tag
How to Set It Up (Step-by-Step):
- Bake or purchase fresh vanilla cupcakes and allow them to cool completely before decorating. Warm cupcakes can melt the frosting and ruin the surprise.
- Using a cupcake corer or a small knife, remove a small circle from the center of each cupcake. Be careful not to cut all the way to the bottom.
- Fill each opening with blue candy-coated chocolates, blue sprinkles, or tiny chocolate pearls. Don’t overfill—the removed cake piece still needs to fit back on top.
- Replace the small cake piece over the candy filling so the cupcakes look untouched.
- Prepare smooth buttercream frosting. You can frost all the cupcakes in white for a classic look or use pale blue to match the baby boy theme.
- Pipe generous swirls of frosting onto each cupcake using a large star tip. I always add plenty because tall swirls make homemade cupcakes look bakery-worthy.
- Decorate with blue sprinkles, edible pearls, or a small fondant baby footprint if you’d like an extra-special touch.
- Arrange the cupcakes neatly inside a cupcake gift box. Make sure each cupcake sits securely in its holder so it doesn’t slide during transport.
- Tie a wide ribbon around the outside of the box and attach a handwritten tag with a message like:
“One sweet bite reveals our little surprise!” - Keep the cupcakes refrigerated if your frosting requires it, then bring them to room temperature about 30 minutes before serving for the best flavor.
- Gather everyone together before opening the box. Hand a cupcake to each guest but ask everyone to wait until the count of three before taking a bite.
- Count down together, then let everyone bite into the cupcakes at the same time. Watching guests realize they’ve all found blue candy inside is one of my favorite party moments.
- Keep a camera ready because the smiles, laughter, and genuine reactions happen quickly and make wonderful keepsake photos.
- Send any leftover cupcakes home in small bakery boxes so family members can continue celebrating after the party ends.
7. Chocolate-Covered Oreo Reveal Box
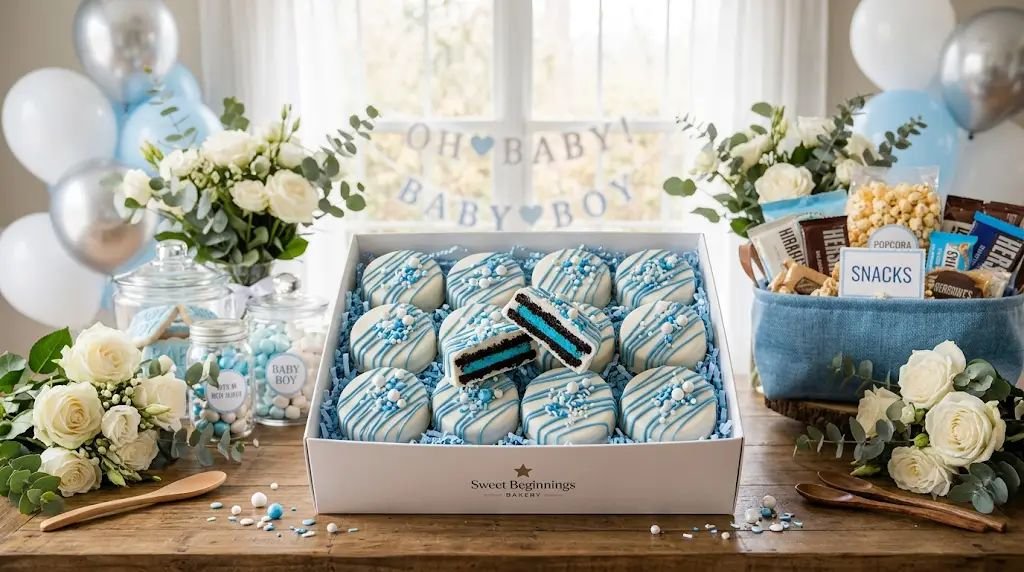
The Concept:
This is one of the easiest edible gender reveal gifts to prepare ahead of time, and it always looks impressive. From the outside, the Oreos are decorated in elegant white and blue, but when guests bite into them, they find a bright blue cream filling. I love this idea because it’s simple enough for beginners while still feeling like something from a bakery.
Estimated Budget:
Low to Medium: $25–$55
Materials Needed:
- 24 Oreo cookies
- White candy melts
- Blue food coloring (oil-based if coloring chocolate)
- Blue vanilla frosting or blue-tinted buttercream
- Disposable piping bag
- Blue sprinkles
- Edible pearls
- Food-safe decorating pen (optional)
- Parchment paper
- Decorative bakery box
- Ribbon
- Gift tag
How to Set It Up (Step-by-Step):
- Twist each Oreo apart carefully so both cookie halves stay intact. Try not to break the cookies, as they’ll be reassembled later.
- Remove the original filling with a butter knife or small offset spatula.
- Fill a piping bag with blue buttercream or blue vanilla frosting and pipe a generous amount onto one cookie half.
- Gently place the second cookie half back on top and press lightly until the filling reaches the edges without spilling over.
- Chill the filled cookies in the refrigerator for about 20 minutes so the frosting firms up before dipping.
- Melt the white candy melts according to the package directions, stirring until smooth.
- Using a fork or dipping tool, coat each Oreo completely in the melted candy coating.
- Tap the fork gently against the bowl to remove excess coating before placing each cookie onto parchment paper.
- Decorate immediately with blue sprinkles, edible pearls, or thin blue chocolate drizzles before the coating hardens.
- Allow the cookies to set completely at room temperature or refrigerate them for a few minutes if you’re short on time.
- Arrange the decorated Oreos neatly inside a bakery gift box, placing parchment paper between layers if you’re stacking them.
- Tie a soft blue ribbon around the box and attach a tag that says something playful like:
“One bite tells the sweetest story.” - During the reveal, invite everyone to take a cookie at the same time. The surprise blue filling creates a fun shared moment that’s simple but memorable.
- Any leftovers can be packaged in small treat bags as edible party favors for guests to enjoy at home.
8. Blue Hot Cocoa Bomb Surprise Basket
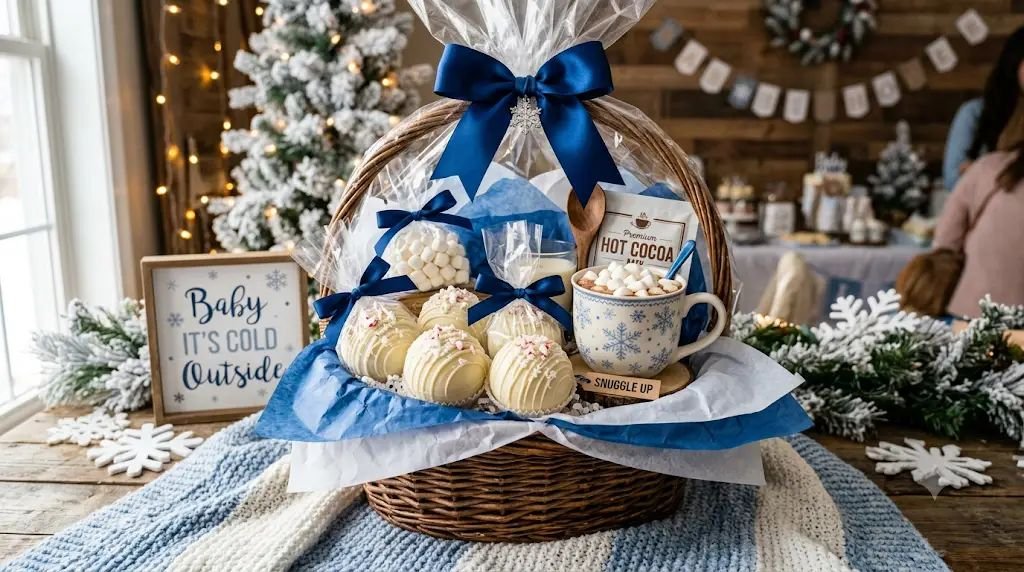
The Concept:
I started making hot cocoa bombs during the holidays, and they quickly became one of my favorite edible gifts for baby showers too. They’re cozy, fun to watch melt, and perfect for the mom-to-be to enjoy during quiet evenings before or after the baby arrives.
Estimated Budget:
Medium: $35–$65
Materials Needed:
- Silicone sphere mold
- White chocolate or candy melts
- Blue mini marshmallows
- Hot cocoa mix
- Blue sprinkles
- White chocolate drizzle
- Food-safe edible glitter (optional)
- Decorative mugs
- Cellophane bags
- Ribbon
- Gift basket
- Tissue paper
- Personalized instruction tag
How to Set It Up (Step-by-Step):
- Wash and dry the silicone molds completely before making the cocoa bombs.
- Melt the white chocolate until smooth and spoon it into each mold cavity.
- Spread the chocolate evenly around the inside using the back of a spoon, making sure there are no thin spots.
- Refrigerate the molds until the chocolate hardens, then apply a second layer for extra strength.
- Carefully remove the chocolate shells from the molds without cracking them.
- Fill half of the shells with hot cocoa mix, blue mini marshmallows, and a few festive blue sprinkles.
- Warm the edge of an empty shell on a warm plate for just a second or two, then press it onto the filled shell to seal the cocoa bomb.
- Decorate the outside with white chocolate drizzle and a sprinkle of edible glitter for a polished finish.
- Place each cocoa bomb into an individual cellophane bag and tie it with a blue ribbon.
- Arrange one or two decorative mugs inside a gift basket lined with blue tissue paper.
- Nestle the wrapped cocoa bombs beside the mugs, making sure they’re secure and won’t roll around.
- Include a small instruction card that explains how to use them: place one cocoa bomb in a mug, pour hot milk over it, stir, and enjoy.
- Add a handwritten note with a sweet message such as:
“Here’s to warm hugs, sweet moments, and cozy nights with your little boy.” - Present the basket at the shower or save it as a special gift to deliver closer to the baby’s arrival. From my experience, moms appreciate having a comforting treat waiting for them after those long newborn days.
9. Movie Night Snack Gift Crate
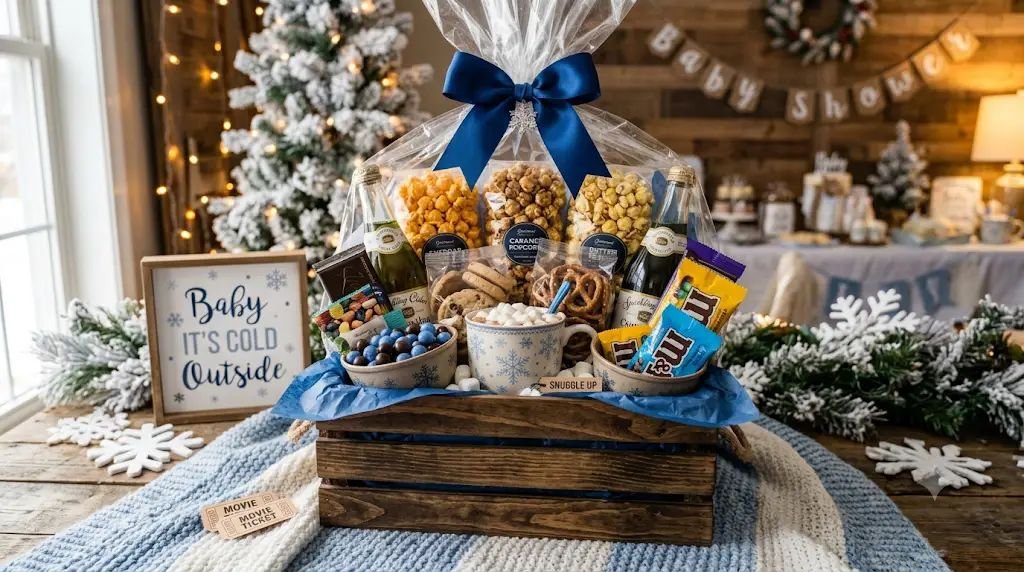
The Concept:
One thing I’ve learned from talking to new moms is that quiet evenings become extra special before the baby arrives. That’s why I love putting together a movie night snack crate. It’s filled with ready-to-eat treats, cozy drinks, and a few sweet surprises so the parents-to-be can enjoy one last relaxing movie night together.
Estimated Budget:
Medium: $35–$70
Materials Needed:
- Wooden crate or decorative storage box
- Microwave popcorn
- Gourmet popcorn
- Pretzels
- Potato chips
- Trail mix
- Chocolate bars
- Chocolate-covered almonds
- Blue gummy candy
- Cookies
- Mini marshmallows
- Sparkling cider
- Two reusable snack bowls
- Blue ribbon
- Tissue paper
- Personalized gift tag
How to Set It Up (Step-by-Step):
- Start by lining the wooden crate with blue tissue paper or shredded paper filler. This gives the gift a finished look while helping everything stay in place.
- Place the largest items, such as popcorn bags and sparkling cider, toward the back of the crate. These create height and make the display look fuller.
- Arrange snack bags like pretzels, trail mix, and potato chips in the middle. Stand them upright so the packaging is easy to see.
- Fill the front of the crate with smaller treats like chocolate bars, cookies, gummy candies, and chocolate-covered almonds. Mixing different package sizes creates a balanced arrangement.
- Add two reusable snack bowls on opposite corners of the crate. They make the gift feel complete and can be used long after the snacks are gone.
- Tuck mini marshmallows into small glass jars or treat bags for a cute homemade touch.
- Check for empty spaces and fill them with crumpled tissue paper so nothing shifts during transportation.
- Wrap the entire crate with clear cellophane if you’re giving it as a formal gift.
- Tie a wide blue ribbon around the crate and finish with a large bow.
- Attach a handwritten note that says:
“One cozy movie night before your biggest adventure begins.” - Store the crate in a cool, dry place until the shower.
- Present it on the gift table where guests can easily admire the variety of snacks and thoughtful presentation.
10. Gourmet Popcorn & Pretzel Gift Box
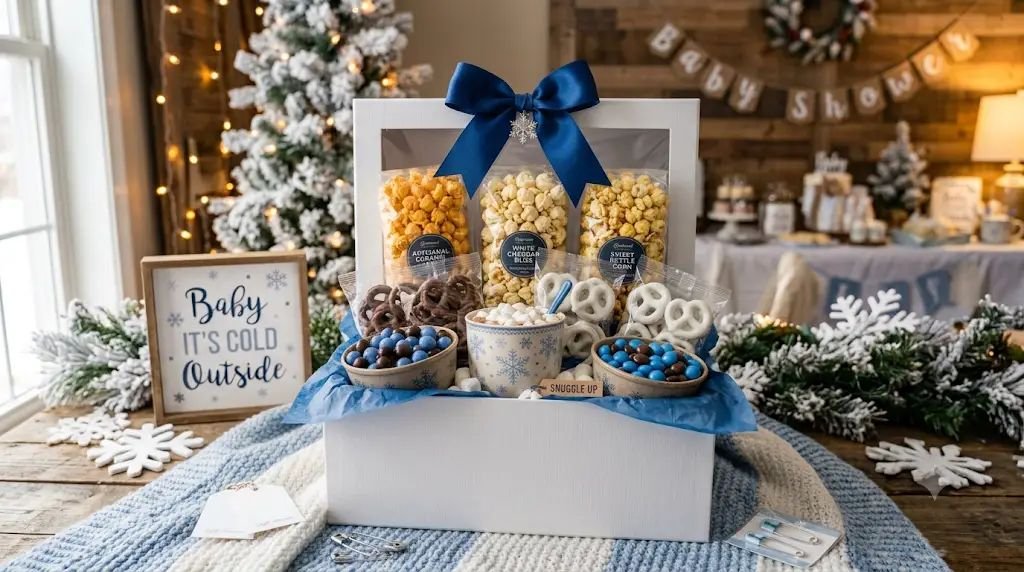
The Concept:
This gift always reminds me of those snack boxes you’d happily order online, except it’s much more personal. I like mixing sweet popcorn, savory popcorn, chocolate-covered pretzels, and homemade seasonings into one beautiful package. It’s simple to assemble but always looks expensive.
Estimated Budget:
Low to Medium: $25–$55
Materials Needed:
- Decorative gift box
- White cheddar popcorn
- Caramel popcorn
- Kettle corn
- Chocolate-covered pretzels
- Yogurt-covered pretzels
- Blue candy-coated chocolates
- Small treat bags
- Twist ties
- Blue ribbon
- Gift tag
- Shredded paper filler
How to Set It Up (Step-by-Step):
- Divide each popcorn flavor into separate food-safe treat bags. I prefer smaller portions because they’re easier to snack on later.
- Seal every bag tightly with twist ties to keep everything fresh.
- Package the chocolate-covered pretzels separately so they don’t soften the popcorn.
- Arrange shredded paper inside the decorative gift box.
- Place the popcorn bags standing upright across the back of the box, alternating colors and flavors for visual appeal.
- Position the pretzel bags in front of the popcorn, creating a layered display.
- Scatter a handful of individually wrapped blue chocolates between the snack bags to fill empty spaces.
- Add a small handwritten card listing all the popcorn flavors included inside.
- Close the gift box carefully and tie it with a wide blue ribbon.
- Add a tag reading:
“A little crunch, a little sweetness, and lots of happy moments.” - Keep the gift away from direct sunlight so the chocolate coating stays firm.
- Set the completed gift box on the dessert table or gift station where it doubles as party décor until it’s opened.
11. Blue Candy Charcuterie Board Gift Box
The Concept:
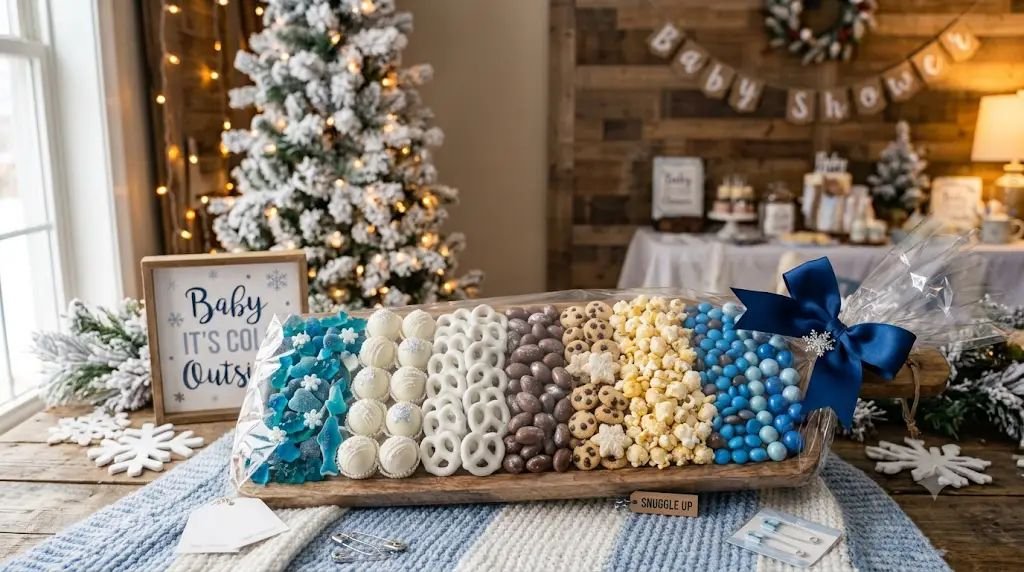
Charcuterie boards have become one of my favorite party trends, so I thought, why not make a sweet version for a baby shower? This edible gift is filled with blue and white candies arranged beautifully on a wooden serving board. The mom-to-be can enjoy it during the shower or save it for family visits after the baby arrives.
Estimated Budget:
Medium: $40–$80
Materials Needed:
- Medium wooden serving board
- Blue gummy candies
- Blue chocolate candies
- White chocolate truffles
- Yogurt-covered pretzels
- Chocolate-covered almonds
- Mini cookies
- Popcorn
- Decorative parchment paper
- Clear gift wrap
- Blue ribbon
- Personalized tag
How to Set It Up (Step-by-Step):
- Cover the serving board with a sheet of decorative food-safe parchment paper.
- Begin arranging the largest treats first, such as popcorn and mini cookies, leaving small gaps between each section.
- Fill the remaining spaces with blue gummies, chocolate candies, yogurt pretzels, and chocolate-covered almonds.
- Alternate colors and textures so the board looks balanced instead of placing similar candies together.
- Step back occasionally to check the overall arrangement and adjust sections if one side appears too full.
- Once you’re happy with the layout, wrap the entire board tightly with clear food-safe wrap.
- Tie a wide blue ribbon around both ends of the board.
- Add a personalized gift tag with a sweet message.
- Refrigerate the board if your candies require cooler temperatures.
- Bring it to the shower shortly before guests arrive so everything stays fresh.
- Place it near the dessert display where everyone can admire the colorful presentation before it’s enjoyed.
- Encourage the mom-to-be to reuse the wooden board later for family gatherings or snack nights.
12. Homemade Brownie & Blondie Treat Tin
The Concept:
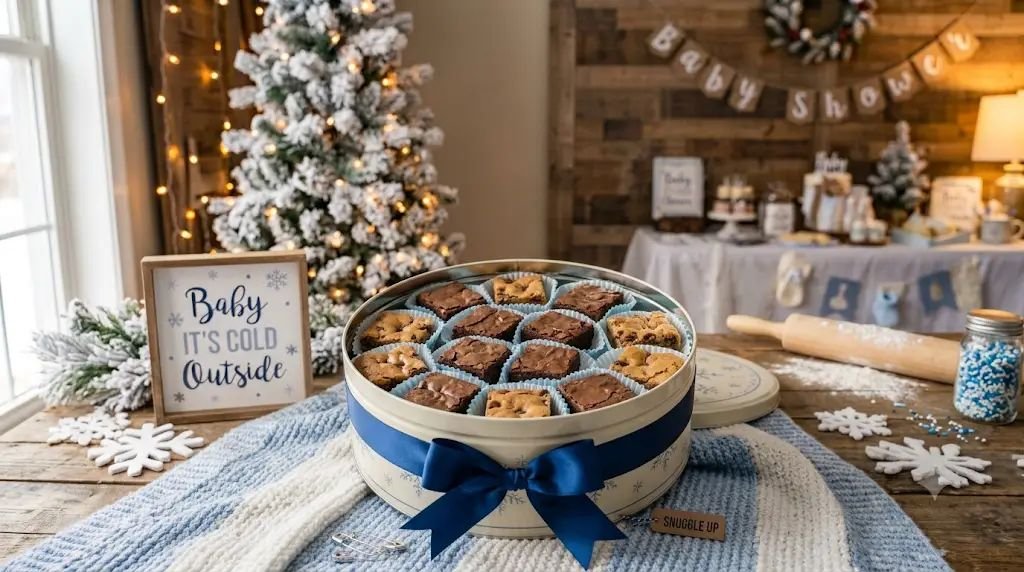
Whenever I bake brownies for a baby shower, they’re usually the first dessert to disappear. Packaging brownies and blondies together in a decorative tin creates a homemade gift that feels warm, comforting, and genuinely thoughtful.
Estimated Budget:
Low: $20–$45
Materials Needed:
- Decorative cookie tin
- Homemade brownies
- Homemade blondies
- Parchment paper
- Wax paper
- Blue ribbon
- Gift tag
- Small paper baking cups
- Tissue paper
How to Set It Up (Step-by-Step):
- Bake the brownies and blondies at least several hours before assembling the gift so they’re completely cool.
- Cut every brownie into evenly sized squares using a sharp knife cleaned between cuts.
- Place each piece into a small paper baking cup. This keeps the treats neat and easy to serve.
- Line the cookie tin with parchment paper.
- Arrange alternating rows of brownies and blondies inside the tin.
- If you’re stacking layers, place a sheet of wax paper between them to prevent sticking.
- Fill any empty corners with individually wrapped chocolates or small candies.
- Close the tin securely and wrap a blue ribbon around it.
- Attach a handwritten tag that says:
“Made with love for sweet moments ahead.” - Store the tin in a cool place until the shower begins.
- Present it with a small serving knife if the pieces are extra large.
- Remind the mom-to-be that brownies freeze beautifully, so she can save a few for after the baby arrives.
13. Donut & Coffee Morning Gift Basket
The Concept:
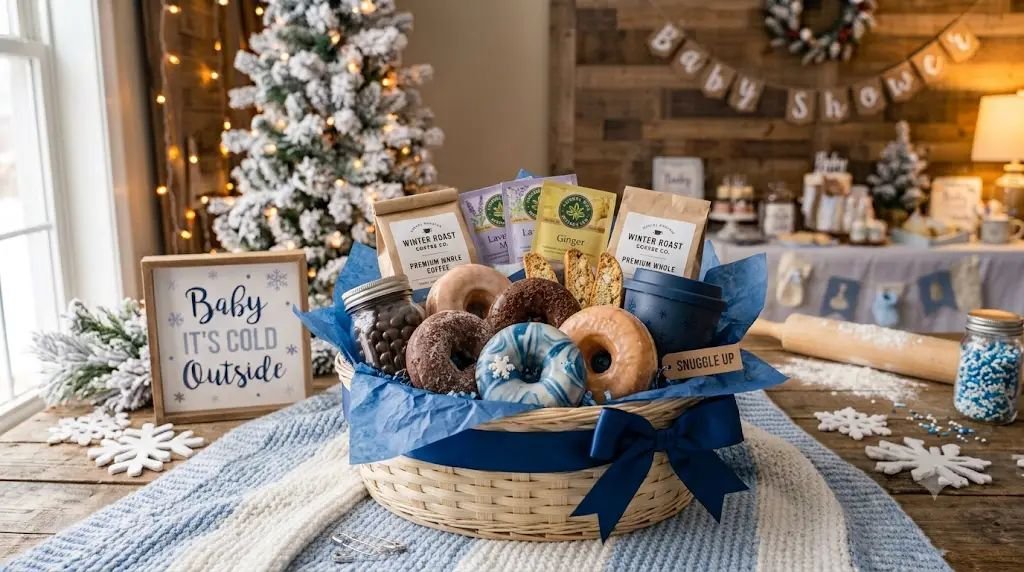
This is probably the edible gift I’ve received the most compliments on. Fresh donuts paired with quality coffee and tea make an incredibly thoughtful surprise, especially for parents who know peaceful mornings will soon become a little busier.
Estimated Budget:
Medium: $35–$75
Materials Needed:
- Decorative basket
- Assorted fresh donuts
- Ground coffee or coffee pods
- Herbal tea assortment
- Biscotti
- Chocolate-covered espresso beans
- Reusable coffee mug
- Blue tissue paper
- Cellophane wrap
- Blue ribbon
- Personalized gift tag
How to Set It Up (Step-by-Step):
- Purchase fresh donuts on the morning of the shower so they taste their best.
- Place each donut inside an individual bakery bag or pastry box to keep them fresh.
- Line the basket with blue tissue paper, creating enough cushioning for the food items.
- Position the coffee bags or coffee pods toward the back of the basket.
- Arrange the packaged donuts neatly across the front, mixing different flavors for variety.
- Add the herbal tea assortment beside the coffee so there are options for every mood.
- Place biscotti and chocolate-covered espresso beans into small treat bags before adding them to the basket.
- Include a reusable coffee mug tucked securely into one corner.
- Wrap the basket with clear cellophane and gather it neatly at the top.
- Tie a large blue ribbon around the gathered wrap to finish the presentation.
- Attach a handwritten note that reads:
“Wishing you peaceful mornings, warm coffee, and lots of cuddles with your little boy.” - Deliver the basket shortly before the shower starts so the donuts stay fresh and soft. In my experience, this gift is always opened with a smile because it’s something the parents can enjoy together almost immediately.
Conclusion
When I think back on the baby showers I’ve helped plan, the gifts everyone remembers aren’t always the biggest or the most expensive. They’re the ones that feel personal and bring people together. Edible gifts have a way of doing exactly that. They add something fun to the celebration while giving the mom-to-be treats she can actually enjoy instead of storing away.
Whether you choose a snack basket filled with her favorite goodies, a homemade cookie jar, or a creative gender reveal dessert, the little details make all the difference. A handwritten note, thoughtful packaging, and a few favorite flavors turn simple ingredients into meaningful gifts. My advice is to keep it practical, make it with love, and don’t worry about making everything perfect. Those homemade touches are usually what people remember most, and they’re what make a baby shower feel warm, welcoming, and truly special.