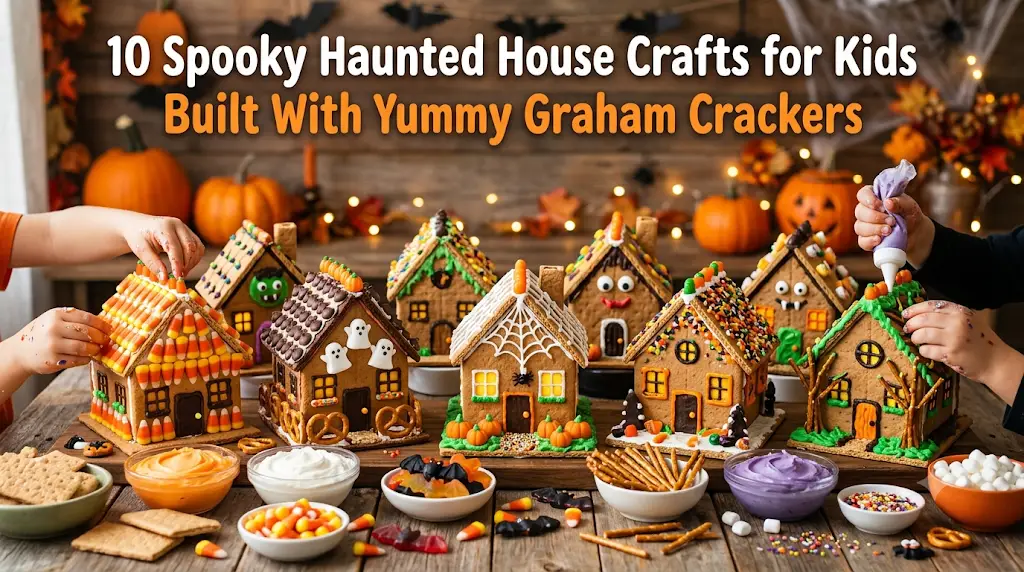
Halloween is one of my favorite times to pull out the craft supplies and gather kids around the table. If you’re a parent trying to fill a rainy afternoon or a teacher looking for a festive, screen-free classroom activity, graham cracker haunted houses are always a huge hit. They’re simple enough for little hands, creative enough to keep everyone engaged, and delicious enough that nobody minds if a few decorations mysteriously disappear during crafting.
I’ve made versions of these treats with preschoolers, kindergarten classes, and my own family, and one thing never changes—they’re wonderfully messy. Frosting ends up on tiny fingers, candy somehow rolls under the table, and every haunted house turns out completely different. That’s exactly what makes these Halloween crafts so memorable. Instead of aiming for perfection, encourage kids to let their imaginations create the spookiest (or silliest!) haunted house they can dream up.
Safety First
Adult supervision is always recommended during these activities. Preschoolers should use child-safe scissors whenever cutting packaging or paper decorations, and adults should handle any sharp tools if needed. Small decorations like mini candies, sprinkles, googly eyes, or tiny cookies can be choking hazards for young children, so keep a close eye on little crafters. Remember that these edible crafts are meant to be fun, but clean hands and food-safe work surfaces are just as important as the decorations.
1. Classic Candy Graham Cracker Haunted House
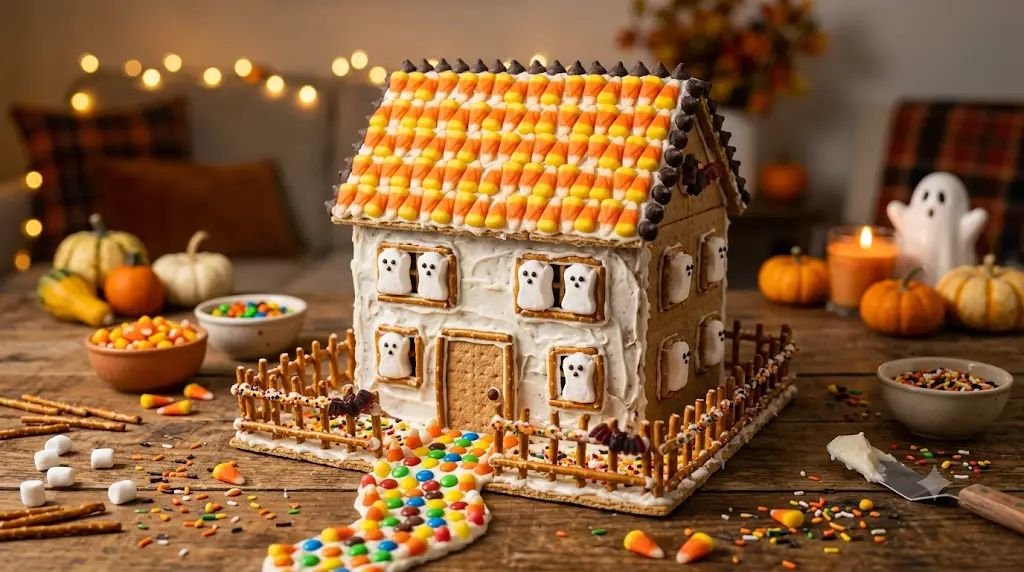
A traditional haunted house is the perfect place to start. This version is easy for preschoolers to decorate while giving older kids plenty of room to add creative spooky details. Every classroom I’ve made these with has ended up looking like a tiny haunted neighborhood, and no two houses have ever looked alike.
Skill Developed: Fine motor skills, creativity, hand-eye coordination, color recognition, and early planning skills.
Materials Needed:
- 4–6 graham cracker rectangles
- Royal icing or thick vanilla frosting
- Disposable piping bag or zip-top bag
- Mini marshmallows
- Candy corn
- Chocolate chips
- Pretzel sticks
- Mini cookies
- Halloween sprinkles
- Wax paper or paper plate
- Plastic butter knife
Step-by-Step Instructions:
- Prepare the workspace by covering the table with wax paper or a disposable tablecloth. Give each child a paper plate to build on so the haunted house can easily be moved later.
- Fill a piping bag with thick frosting. If using a zip-top bag, snip a tiny corner to create a simple decorating bag. Thick frosting works much better than runny frosting because it acts like edible glue.
- Lay one graham cracker flat to create the base of the haunted house. Spread a generous line of frosting around the edges where the walls will stand.
- Attach two graham crackers upright to form the side walls. Hold each one gently for about 20–30 seconds so the frosting has time to grip.
- Add the front and back walls using two more graham crackers. Encourage children to work slowly since this is usually the trickiest part. It’s perfectly normal if the walls wobble a little.
- Create the roof by piping frosting along the top edges of the walls. Carefully lean two graham crackers together into an upside-down “V” shape to form the roof. Let the structure sit for several minutes before decorating.
- Decorate the roof with rows of mini marshmallows or chocolate chips. Kids often enjoy making uneven patterns because they make the haunted house look old and spooky.
- Build a creepy front door using a rectangular cookie or chocolate square. Pipe frosting around it to look like an old wooden frame.
- Create ghostly windows by outlining squares with frosting. Place mini marshmallows or white candies inside each window to make them appear haunted.
- Add candy corn around the yard like glowing pumpkins or spooky pathway lights leading to the front entrance.
- Break pretzel sticks into small pieces to build an old crooked fence. Attach each section with frosting around the front yard.
- Finish with Halloween sprinkles scattered across the roof and ground. Purple, orange, black, and green sprinkles instantly make the entire house look festive.
- Allow the house to rest for 15–20 minutes before moving it. Young children often get excited to pick it up right away, but waiting helps prevent collapsing walls.
Expect frosting-covered fingers and plenty of giggles during this activity. In my experience, the “accidental” candy tasting begins almost immediately, and that’s part of the fun.
Pro-Tip / Teacher’s Note: Keep extra graham crackers nearby. Little builders occasionally lean too hard on a wall, and having replacements ready saves lots of frustration.
2. Chocolate Cookie Haunted Mansion
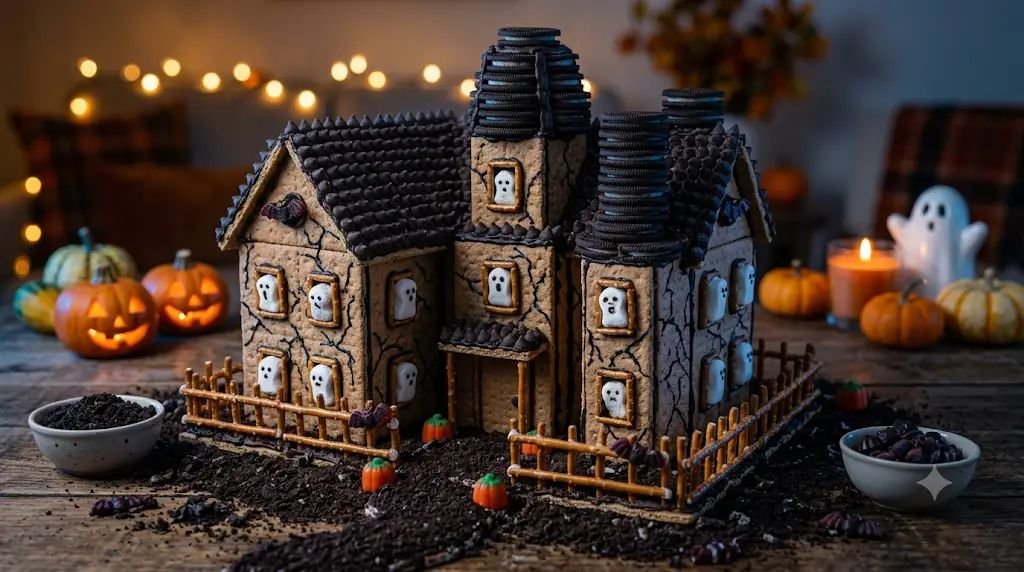
If your kids love extra spooky Halloween treats, adding chocolate sandwich cookies gives this haunted mansion an older, darker look. Preschoolers especially enjoy stacking the cookies into towers and pretending friendly ghosts live inside.
Skill Developed: Spatial awareness, fine motor control, imaginative play, problem-solving, and patience.
Materials Needed:
- Graham crackers
- Chocolate sandwich cookies
- Royal icing
- Mini chocolate chips
- Pretzel sticks
- Mini marshmallows
- Black decorating gel
- Halloween sprinkles
- Paper plate
- Plastic knife
Step-by-Step Instructions:
- Build the basic graham cracker house using frosting as edible glue. Allow the walls to stand for several minutes before adding heavier decorations.
- Place chocolate sandwich cookies on each side of the house to create spooky towers. Add frosting between each cookie so they stack securely.
- Top each tower with another cookie laid flat to resemble an old castle turret.
- Use pretzel sticks as support beams or tiny fence posts around the haunted mansion.
- Draw cracked walls using black decorating gel. Kids love making zigzag lines that resemble old stone buildings.
- Press chocolate chips onto the roof to look like weathered roof shingles.
- Add mini marshmallows near windows and doors to create friendly little ghosts peeking outside.
- Pipe frosting vines climbing up the walls before covering them with green sprinkles for a creepy overgrown effect.
- Scatter crushed chocolate cookies around the base to resemble dark dirt surrounding the haunted house.
- Invite children to invent a story about who lives inside. This simple conversation often keeps preschoolers engaged even after the decorating is finished.
Whenever I make this craft with younger children, they spend almost as much time creating stories as they do decorating. The imagination really takes over once the haunted mansion is finished.
Pro-Tip / Teacher’s Note: Assemble the main house before passing out the cookies. Younger preschoolers sometimes eat the building supplies before construction begins!
3. Ghost Town Graham Cracker Cottage
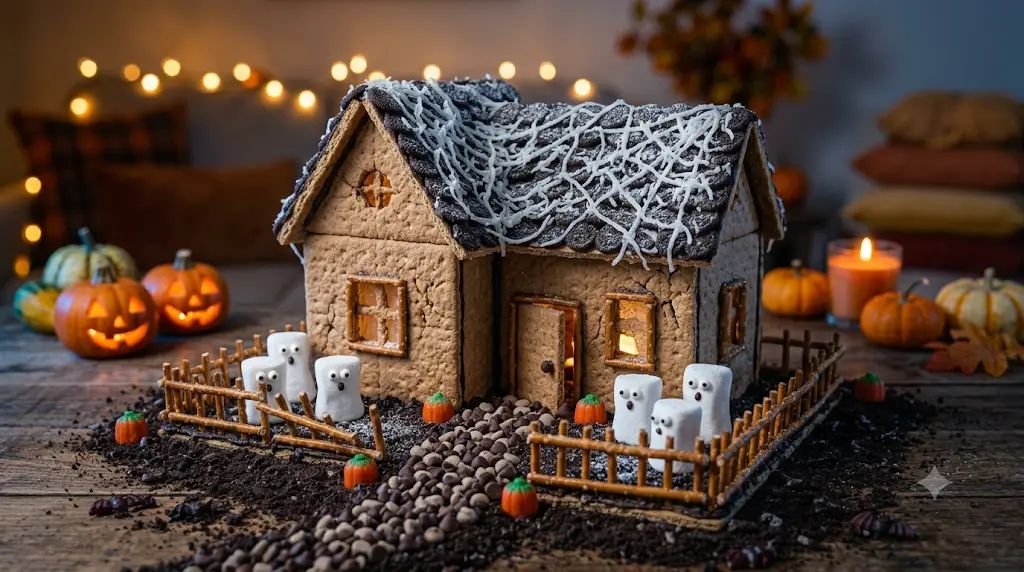
Instead of building one large haunted house, this activity creates a tiny haunted cottage surrounded by adorable edible ghosts. It’s one of my favorite projects for younger preschoolers because the decorating is simple while still feeling magical.
Skill Developed: Creative thinking, hand-eye coordination, sequencing, fine motor development, and storytelling.
Materials Needed:
- Graham crackers
- Vanilla frosting
- Mini marshmallows
- Edible candy eyes
- Mini chocolate chips
- Shredded coconut
- Pretzel sticks
- White decorating sugar
- Paper plate
- Plastic spoon
Step-by-Step Instructions:
- Construct a small graham cracker cottage using four walls and a simple roof. Since this version is smaller than the first craft, it comes together quickly for younger children.
- Spread frosting generously across the roof. Don’t worry about making it perfectly smooth. The uneven texture actually helps decorations stick better.
- Sprinkle shredded coconut over the frosting to create an old cobweb-covered rooftop. Kids usually love watching the coconut stick like fluffy spider webs.
- Place mini marshmallows around the yard. Add tiny edible candy eyes to transform each marshmallow into a friendly Halloween ghost.
- Build a winding pathway from mini chocolate chips leading up to the front door.
- Break pretzel sticks into uneven lengths and arrange them into a broken fence surrounding the cottage. Crooked fences always look more realistic than perfectly straight ones.
- Sprinkle white decorating sugar over the yard to resemble glowing moonlight or magical Halloween mist.
- Pipe frosting around the doorway to create spooky swirls. Encourage children to make curly lines rather than perfect circles.
- Add a few ghost marshmallows peeking from behind the house or fence. Kids absolutely love hiding little surprises throughout their creations.
- Finish by letting children name their haunted cottage and describe who lives there. This simple storytelling activity builds language skills while making the craft feel personal.
One thing I’ve noticed after making this project several times is that children become incredibly proud when their haunted houses all look different. Some create silly ghost families, while others invent spooky but friendly monsters who bake Halloween cookies.
Pro-Tip / Teacher’s Note: If edible candy eyes aren’t available, simply dot mini marshmallows with black decorating gel. It’s quicker, less expensive, and preschoolers enjoy making funny ghost faces just as much.
4. Witch’s Candy Cottage Haunted House
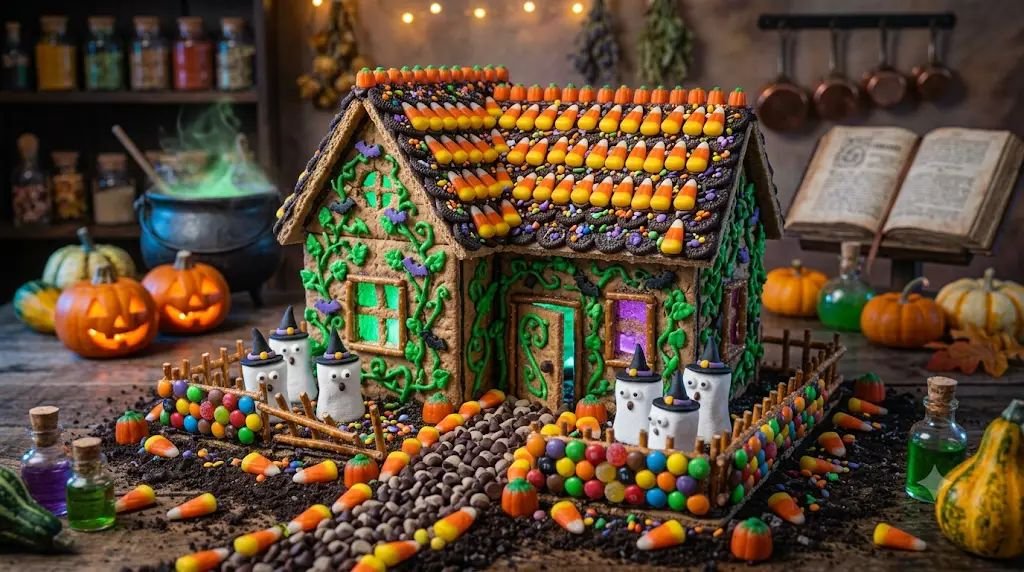
This haunted cottage looks like it belongs to a friendly Halloween witch who loves baking magical treats. Children have so much fun decorating the roof with colorful candy that they hardly notice they’re strengthening important fine motor skills along the way.
Skill Developed: Fine motor skills, pattern recognition, creativity, hand-eye coordination, and imaginative storytelling.
Materials Needed:
- 4–6 graham cracker rectangles
- Royal icing or thick vanilla frosting
- Candy corn
- Purple and green round candies
- Mini chocolate chips
- Pretzel sticks
- Green decorating icing
- Halloween sprinkles
- Paper plate
- Plastic butter knife
Step-by-Step Instructions:
- Assemble the haunted cottage by attaching the graham cracker walls with thick frosting. Hold each wall gently until it stands on its own. Preschoolers sometimes need an extra pair of helping hands during this step.
- Attach the roof carefully and allow the structure to rest for about 10 minutes. Waiting a little now helps prevent the roof from sliding once decorations become heavier.
- Cover the roof with frosting using a plastic knife. Encourage children to spread it from the bottom upward just like frosting a cupcake.
- Line the roof with candy corn so it looks like crooked roof tiles. The uneven edges make the house appear wonderfully old and spooky.
- Create a magical front door using a chocolate cookie or graham cracker square. Pipe green icing around the frame to resemble glowing vines.
- Add windows by outlining small squares with frosting. Place purple or green candies in the center of each one to look like mysterious glowing lights.
- Build a crooked chimney from stacked mini chocolate bars or pretzel pieces secured with frosting.
- Decorate around the chimney with green icing swirls that resemble magical smoke floating into the night sky.
- Scatter Halloween sprinkles across the yard and roof. Encourage children to use just a pinch at a time so every decoration can still be seen.
- Finish by creating tiny candy bushes beside the front door using clusters of green candies held together with frosting.
- Let children invent a magical story about the kind witch who lives inside. Some children imagine potion classes, while others think the witch bakes cookies for neighborhood ghosts.
I’ve found that children become surprisingly thoughtful while decorating this cottage. They often stop to explain why each candy belongs in a certain place, which builds both creativity and language skills.
Pro-Tip / Teacher’s Note: Divide candies into small bowls before starting. This reduces waiting, sharing disagreements, and accidental candy spills across the table.
5. Spider Web Graham Cracker Haunted House
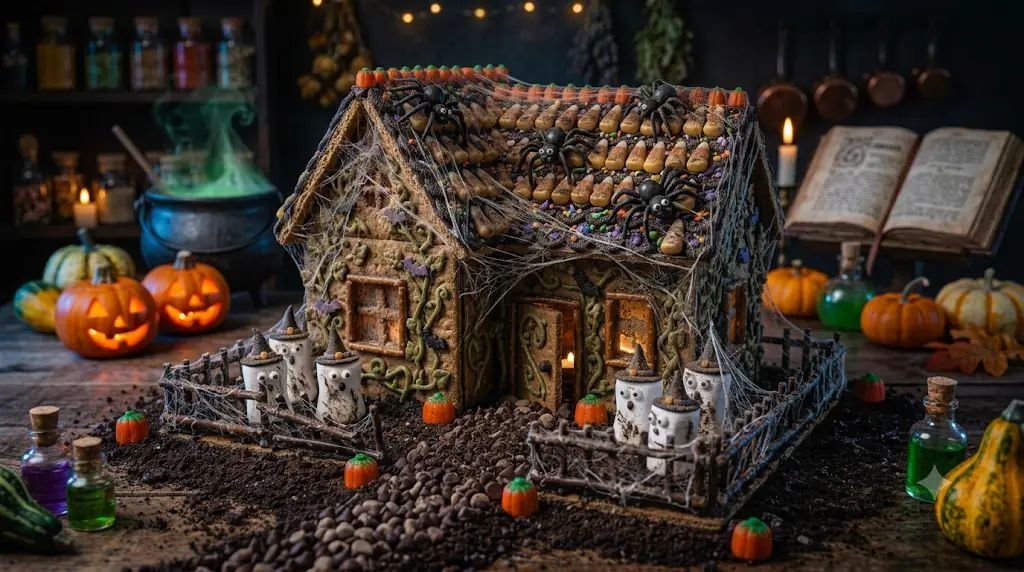
Nothing says Halloween quite like giant spider webs stretched across an old haunted house. This version looks impressive, but the decorating is simple enough for preschoolers with a little guidance.
Skill Developed: Fine motor control, hand strength, visual planning, concentration, and creative expression.
Materials Needed:
- Graham crackers
- Royal icing
- Chocolate sandwich cookies
- Chocolate sprinkles
- Mini chocolate chips
- Candy spiders or plastic spider rings (for decoration only)
- Black decorating gel
- Paper plate
- Plastic knife
Step-by-Step Instructions:
- Build the basic graham cracker house and allow it to sit for several minutes until the frosting begins to firm up.
- Spread a smooth layer of frosting across the roof. A flat surface makes it much easier to create neat spider webs.
- Use black decorating gel to draw several straight lines from the center of the roof outward like the spokes of a bicycle wheel.
- Connect those lines with gently curved circles to complete the spider web design. Preschoolers don’t need perfect circles. In fact, wobbly webs often look more realistic.
- Repeat the web pattern on one wall of the haunted house so it appears abandoned.
- Crush one chocolate sandwich cookie inside a zip-top bag and sprinkle the crumbs around the yard. The dark crumbs resemble spooky soil.
- Place mini chocolate chips near the webs to represent tiny baby spiders waiting nearby.
- Add decorative candy spiders on the roof or beside the doorway. Younger children enjoy carefully choosing where each spider should “crawl.”
- Outline the windows with frosting before adding a few chocolate sprinkles around the edges to make them look dusty and forgotten.
- Inspect the entire haunted house together and ask children where one more spider should hide. This keeps them engaged right until the final decoration is added.
Whenever I’ve introduced candy spiders to preschoolers, there’s always one child who gives every spider a funny name. Those little conversations often become everyone’s favorite part of the activity.
Pro-Tip / Teacher’s Note: If you’re working with very young children, skip tiny candy spiders and simply draw larger spiders with decorating gel to reduce the number of small loose pieces.
6. Pumpkin Patch Haunted House
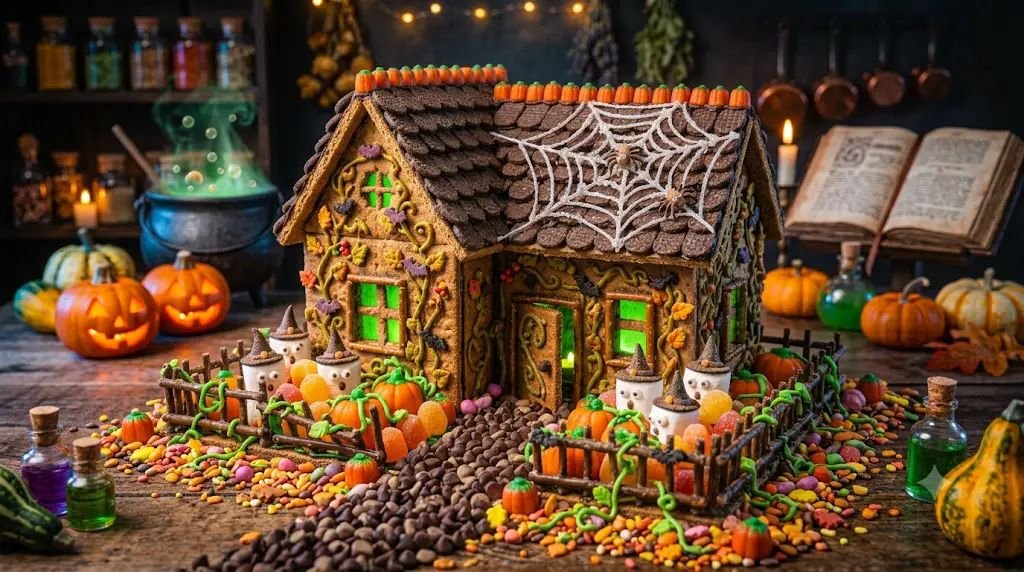
This cheerful haunted house combines spooky fun with a colorful pumpkin patch. It’s a wonderful choice for preschool classrooms because there are lots of simple decorating jobs that everyone can help with.
Skill Developed: Color recognition, fine motor development, counting practice, creativity, and imaginative play.
Materials Needed:
- Graham crackers
- Vanilla frosting
- Candy pumpkins or orange gumdrops
- Green decorating icing
- Pretzel sticks
- Mini marshmallows
- Chocolate chips
- Orange and yellow sprinkles
- Paper plate
- Plastic butter knife
Step-by-Step Instructions:
- Assemble the haunted house with graham crackers and thick frosting. Remind children to press gently rather than squeezing the walls together.
- Allow the structure to rest for about 10 minutes before decorating. This short break gives everyone a chance to wash sticky fingers.
- Spread frosting across the roof and decorate it with orange and yellow sprinkles. The bright colors create a fun Halloween look without making the house too scary.
- Arrange candy pumpkins around the front yard. Encourage children to count them aloud as they place each one. This naturally adds a little early math practice.
- Pipe green icing vines connecting the pumpkins together, just like a real pumpkin patch.
- Create a winding pathway using chocolate chips leading from the pumpkin patch to the front door.
- Break pretzel sticks into short pieces and build a rustic garden fence around the pumpkins.
- Add mini marshmallow ghosts standing between the pumpkins. Attach tiny candy eyes or draw faces with black decorating gel.
- Decorate the doorway with extra frosting swirls to resemble old curling vines climbing around the entrance.
- Invite children to add one final decoration anywhere they choose. Some may add extra pumpkins, while others create funny ghost families or candy gardens.
- Display every finished house together to create a miniature haunted pumpkin village. Children absolutely love comparing everyone’s unique designs without worrying about whose house is “best.”
One thing I always notice with this craft is how proud children become when they see all of the houses lined up together. Even the simplest designs have their own personality, and every child can point out their favorite little details.
Pro-Tip / Teacher’s Note: Pre-sort pumpkins, candies, and sprinkles into individual cups before craft time begins. This keeps little hands from reaching into one large container and makes cleanup much quicker.
7. Monster Face Graham Cracker Haunted House
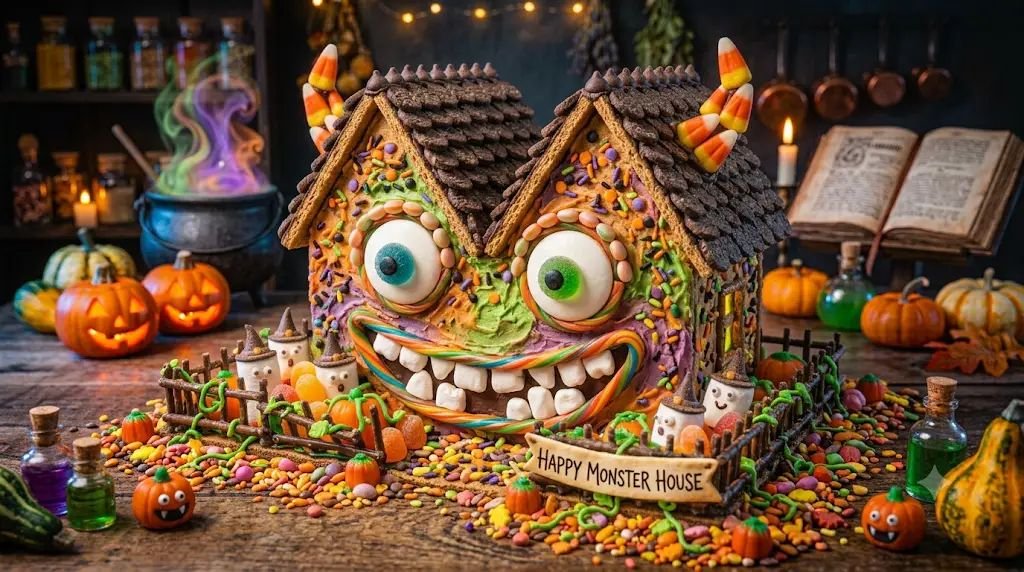
Some haunted houses are spooky, but this one is downright silly! Instead of making a scary home, kids transform the entire house into a giant monster with funny eyes, a goofy smile, and colorful candy details. This craft is always a favorite with preschoolers because there’s no “right” way to decorate a monster.
Skill Developed: Facial recognition, creativity, fine motor skills, hand-eye coordination, and imaginative thinking.
Materials Needed:
- 4–6 graham cracker rectangles
- Royal icing or thick vanilla frosting
- Large candy eyes or edible candy eyes
- Mini marshmallows
- Candy corn
- Chocolate chips
- Red fruit leather or red icing
- Pretzel sticks
- Halloween sprinkles
- Paper plate
- Plastic butter knife
Step-by-Step Instructions:
- Build the graham cracker house by securing all four walls and the roof with thick frosting. Allow the structure to rest for several minutes before decorating.
- Spread a thin layer of frosting over the front wall. This helps candy decorations stick while giving the monster face a bright background.
- Attach two large candy eyes near the top of the front wall. If you’re using edible candy eyes, gently press them into the frosting so they stay in place.
- Create funny monster eyebrows using pretzel stick pieces or lines of black decorating gel. Encourage children to make surprised, sleepy, or silly expressions.
- Build a wide monster smile using red fruit leather or a thick line of red icing. Let kids decide whether their monster is friendly or spooky.
- Press mini marshmallows along the smile to create oversized monster teeth. Uneven teeth usually make everyone laugh even harder.
- Add candy corn as colorful monster horns by attaching one to each side of the roof.
- Decorate the roof with chocolate chips and Halloween sprinkles to resemble monster scales or bumpy skin.
- Pipe frosting around the base and sprinkle extra candies nearby to create a monster’s favorite candy garden.
- Invite children to give their monster a name and describe what kind of voice it has or what it likes to eat. These conversations naturally encourage language development.
- Display all the monster houses together and let children admire how every monster has its own personality.
I’ve noticed that children who are usually nervous about “scary” Halloween crafts absolutely love this version. Once the monster has goofy teeth and giant eyes, it becomes more funny than frightening.
Pro-Tip / Teacher’s Note: Offer plenty of different candy shapes. Kids become incredibly creative when they can choose unique eyebrows, noses, and smiles for their monster houses.
8. Haunted Forest Graham Cracker House
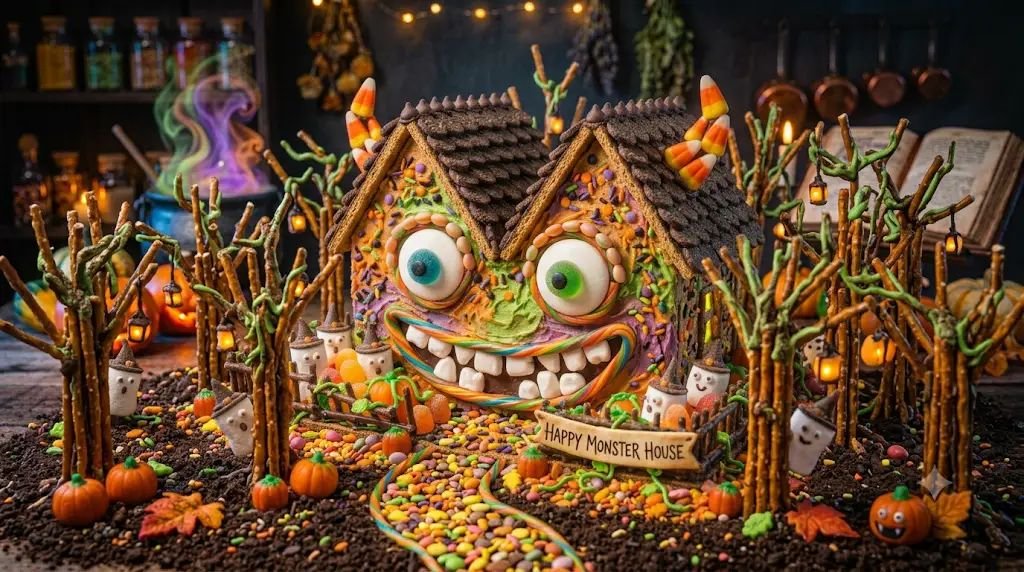
A haunted house hidden deep inside a spooky forest feels like it belongs in a Halloween storybook. This activity lets children create both the house and the mysterious woods surrounding it, making it a wonderful craft for imaginative play.
Skill Developed: Fine motor skills, spatial awareness, creativity, storytelling, and problem-solving.
Materials Needed:
- Graham crackers
- Royal icing
- Pretzel sticks
- Green and black sprinkles
- Mini marshmallows
- Chocolate cookie crumbs
- Green decorating icing
- Chocolate chips
- Paper plate
- Plastic knife
Step-by-Step Instructions:
- Assemble the haunted house with graham crackers and frosting. Let it stand while preparing the forest decorations.
- Spread chocolate cookie crumbs across the paper plate to create dark forest ground. Children love covering the entire area until almost no plate is visible.
- Break pretzel sticks into different lengths to create spooky trees. Press each tree into small frosting dots around the haunted house.
- Pipe green decorating icing onto the tops of the pretzel trees to resemble leafy branches. Don’t worry about perfect shapes—crooked trees look even spookier.
- Sprinkle green and black sprinkles over the icing to add texture to the trees and forest floor.
- Place chocolate chips throughout the forest to create mysterious rocks or hidden woodland treasures.
- Add mini marshmallow ghosts peeking from behind the pretzel trees. Children enjoy hiding them so only part of each ghost can be seen.
- Decorate the roof with frosting and a light dusting of green sprinkles to make it appear covered in moss.
- Create a winding forest path leading to the front door with tiny frosting dots or chocolate chips.
- Encourage children to tell a story about who dares to visit the haunted forest. Some children imagine brave explorers, while others invent friendly woodland ghosts.
- Leave the finished forest untouched for about 15 minutes so the pretzel trees stay securely in place.
This craft almost always turns into a storytelling session. Once the forest is finished, children naturally begin creating adventures for the little ghosts hiding among the trees.
Pro-Tip / Teacher’s Note: Make extra pretzel trees ahead of time. Little hands occasionally snap them while decorating, and replacements help keep frustration low.
9. Rainbow Spooky Haunted House
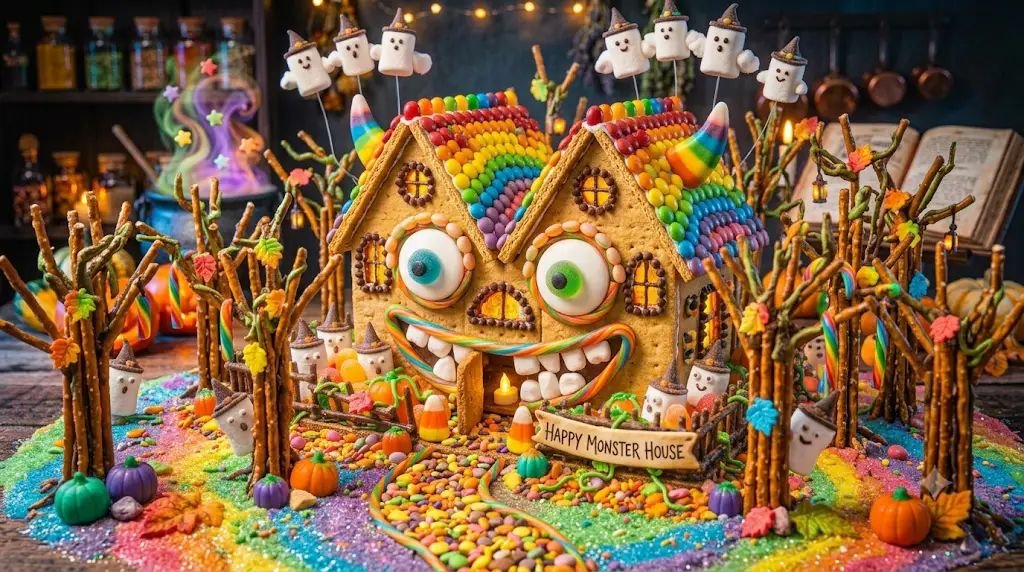
Halloween doesn’t have to be all black and orange. This colorful haunted house proves that spooky can also be bright, cheerful, and full of fun. It’s especially popular with younger children who enjoy decorating with every color they can find.
Skill Developed: Color recognition, fine motor skills, creativity, pattern building, and decision-making.
Materials Needed:
- Graham crackers
- Vanilla frosting
- Rainbow candy pieces
- Mini marshmallows
- Candy sprinkles
- Chocolate chips
- Candy corn
- Paper plate
- Plastic butter knife
Step-by-Step Instructions:
- Construct the haunted house using frosting as edible glue. Check that the walls feel stable before decorating.
- Spread frosting evenly across the roof using a plastic knife. Encourage children to cover every corner so decorations stick well.
- Arrange rainbow candies into colorful rows across the roof. Kids can create stripes, zigzags, or completely random patterns.
- Decorate the windows with chocolate chips placed in neat squares or circles.
- Build fluffy ghost clouds using mini marshmallows along the edges of the roof.
- Place candy corn beside the front door to resemble tiny glowing Halloween lanterns.
- Scatter colorful sprinkles across the yard and roof to give the haunted house a magical sparkle.
- Use frosting to draw swirls around the windows and doorway, making the house look enchanted instead of scary.
- Invite children to count the colors they used while decorating. This is an easy way to reinforce early learning without interrupting the fun.
- Ask each child to choose their favorite decoration and explain why they added it. This encourages confidence and communication.
- Display all the houses together to create a cheerful Halloween village filled with colorful haunted homes.
Every year, at least one child tells me, “Ghosts like rainbows too!” Moments like that remind me that preschoolers see Halloween through wonderfully creative eyes.
Pro-Tip / Teacher’s Note: Sort candies by color into small cups before craft time. It makes decorating easier and gives children a chance to practice identifying colors.
10. Midnight Moon Haunted House
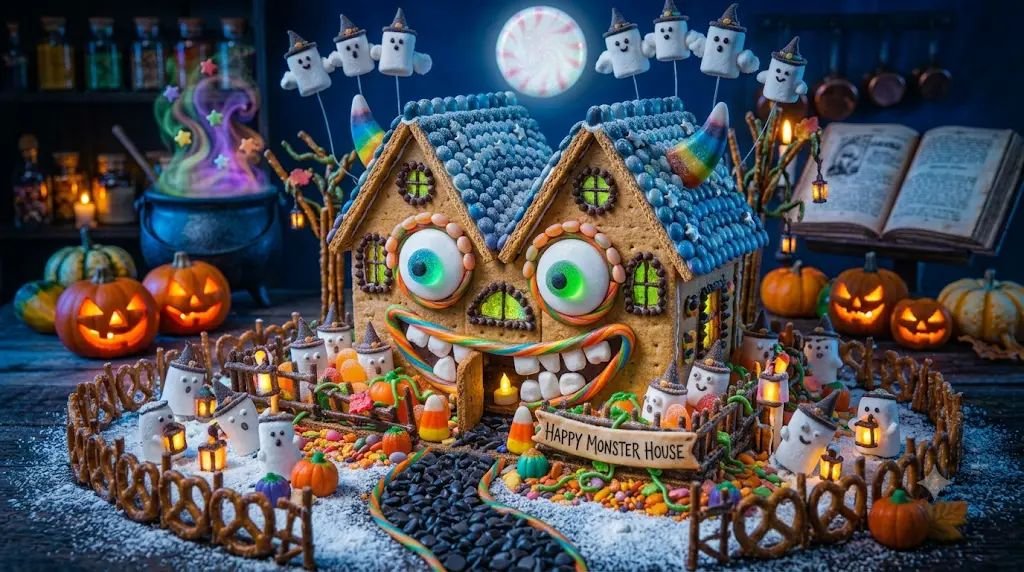
This final haunted house captures the quiet magic of Halloween night. A glowing moon, sparkling stars, and friendly little ghosts give the finished project a storybook feel that children are proud to display before enjoying as a tasty treat.
Skill Developed: Fine motor control, creative thinking, sequencing, hand-eye coordination, and imaginative storytelling.
Materials Needed:
- 4–6 graham cracker rectangles
- Royal icing or vanilla frosting
- Yellow round candy or lemon gumdrop
- White decorating sugar
- Mini marshmallows
- Chocolate chips
- Pretzel sticks
- Blue or purple decorating gel
- Silver or star-shaped sprinkles
- Paper plate
- Plastic butter knife
Step-by-Step Instructions:
- Build the graham cracker haunted house and let the frosting set until the walls and roof are stable.
- Cover the roof lightly with frosting before adding a dusting of white decorating sugar. It creates the look of moonlight shining across the roof.
- Attach a yellow round candy near the top of one roof section to represent a bright full moon.
- Scatter silver or star-shaped sprinkles around the moon to create a sparkling night sky.
- Draw gentle swirls with blue or purple decorating gel around the moon to resemble drifting clouds.
- Place mini marshmallows around the house and decorate them with tiny faces to create friendly nighttime ghosts.
- Build a small pretzel fence leading to the front door, making a cozy yard for the ghosts to gather.
- Use chocolate chips to outline the windows and front door, giving the house extra definition.
- Pipe tiny frosting dots around the yard to resemble glowing pebbles catching the moonlight.
- Allow children to make one final creative choice by adding extra stars, another ghost, or more candy details wherever they think the house needs a finishing touch.
- Leave the haunted house to rest for 15–20 minutes before moving or serving. This helps all of the decorations stay securely attached.
After making this craft with preschool groups, I’ve learned that children are often just as excited to admire everyone’s creations as they are to eat them. There’s always a proud moment when every haunted house is lined up together, each one completely unique.
Pro-Tip / Teacher’s Note: Take a quick class or family photo of the finished haunted houses before snack time. Once little builders start nibbling on the decorations, those spooky masterpieces disappear surprisingly fast!
Conclusion
Building haunted houses from graham crackers is one of those Halloween traditions that children remember long after the frosting has been licked from their fingers. Every little builder brings a different idea to the table, and that’s what makes these edible crafts so special. Some houses end up delightfully spooky, while others look more like candy castles with friendly ghosts waving from the windows.
As someone who’s made these projects with preschool classrooms and family groups, I can honestly say the best moments aren’t the perfectly decorated roofs. They’re the laughter when a wall tips over, the excitement of adding “just one more candy,” and the proud smiles when children show off their finished creations. Expect a little mess, keep plenty of napkins nearby, and enjoy the creativity that comes with every frosting-covered masterpiece.
Whether you’re planning a classroom Halloween party, a rainy afternoon activity at home, or a festive playdate, these graham cracker haunted houses offer the perfect mix of hands-on learning, imaginative play, and a sweet Halloween treat everyone can enjoy together.
FAQs
1. What is the best glue for graham cracker haunted houses?
For edible crafts, royal icing is the strongest choice because it dries firm and helps the walls stay upright. Thick store-bought vanilla frosting also works well, especially for younger children who want to start decorating right away. If the frosting seems too soft, let the assembled house rest for about 10–15 minutes before adding heavier candies.
2. How can I minimize the mess during preschool craft time?
Set each child up with a paper plate or tray to build on, and place a disposable tablecloth or parchment paper underneath. Portion frosting into individual piping bags and divide candies into small cups before the activity begins. Keep a pack of baby wipes or damp paper towels nearby for quick sticky-finger cleanups. A little mess is part of the fun, but a little preparation makes cleanup much easier.
3. Can preschoolers build graham cracker haunted houses by themselves?
Most preschoolers can decorate independently, but they’ll usually need an adult’s help assembling the walls and roof. Once the basic structure is standing, children can confidently add frosting, candies, pretzel fences, marshmallow ghosts, and colorful sprinkles on their own. The goal isn’t perfection—it’s encouraging creativity, confidence, and hands-on learning.