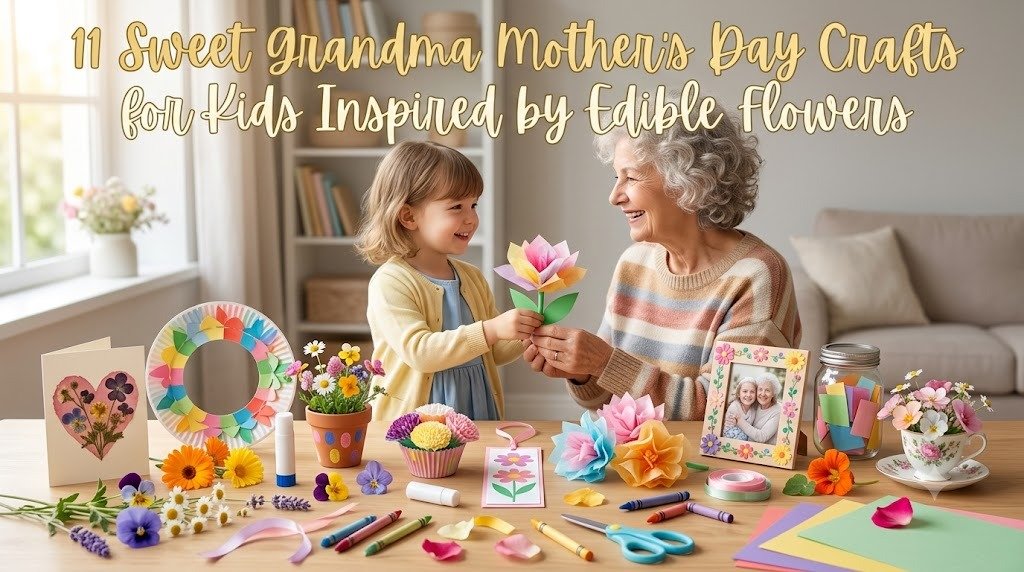
Mother’s Day is the perfect excuse to slow down, pull out the craft supplies, and make something straight from the heart. Over the years, I’ve learned that preschoolers don’t care if every flower petal matches perfectly. They care about making Grandma smile, and those tiny fingerprints, wobbly cuts, and cheerful giggles become part of the gift.
If you’re a parent looking for a screen-free afternoon or a teacher planning a meaningful classroom activity, these edible flower-inspired crafts are simple, affordable, and full of love. Expect a little glitter on the table, bits of paper on the floor, and plenty of proud smiles when little artists hold up their finished creations.
Safety First
These crafts are designed with young children in mind, but adult supervision is always recommended. Preschoolers should use child-safe scissors, non-toxic glue, and washable paints whenever possible. If your project includes small decorations like buttons, beads, or googly eyes, keep a close eye on younger children who may still put items in their mouths.
Remember that crafts with preschoolers are rarely neat—and that’s completely okay. I always cover the table with newspaper or a reusable tablecloth before we begin. Cleanup is much easier, and everyone can focus on enjoying the creative process.
1. Pressed Edible Flower Heart Card
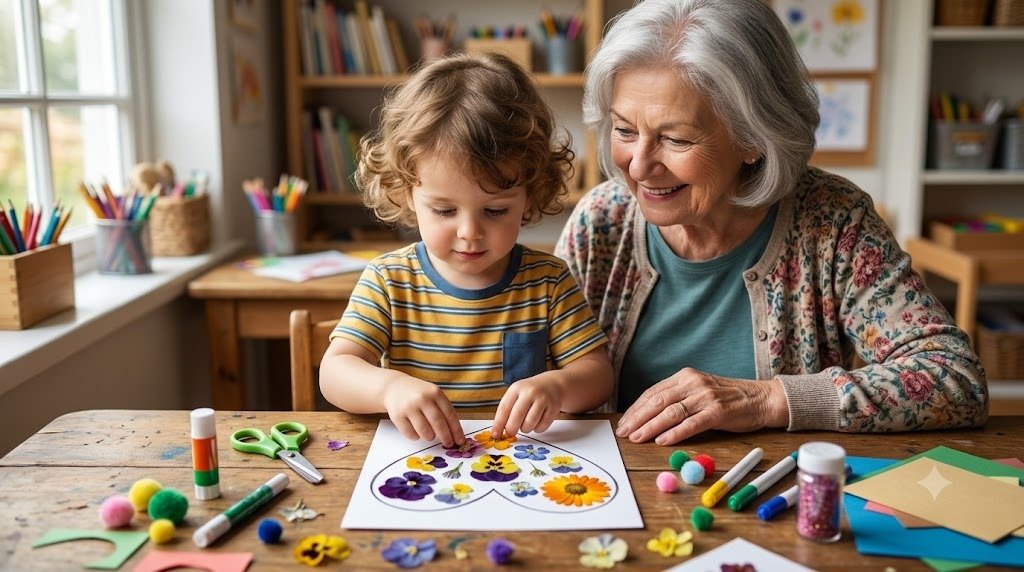
A homemade card never goes out of style. This heart-shaped keepsake uses pressed edible flowers to create a delicate design that Grandma can proudly display long after Mother’s Day has passed.
Skill Developed: Fine motor skills, creativity, hand-eye coordination, and appreciation for nature.
Materials Needed:
- White or colored cardstock
- Pressed edible flowers (such as pansies, violas, or calendula)
- Non-toxic school glue
- Child-safe paintbrush
- Pencil
- Heart template (optional)
- Washable markers or crayons
- Safety scissors
Step-by-Step Instructions:
- Fold the cardstock in half to create a greeting card. Younger children enjoy making the fold themselves, although an adult may need to help line up the edges.
- Draw or trace a large heart on the front of the card. If working with preschoolers, using a cardboard template helps everyone make a nice large heart that’s easy to decorate.
- Brush a thin layer of glue inside the heart using a paintbrush. Encourage children to spread the glue evenly instead of squeezing large puddles directly from the bottle.
- Arrange the pressed flowers one at a time. Let children experiment with different colors and shapes before pressing them into the glue. This is a wonderful opportunity to talk about flower names and colors.
- Fill the entire heart until very little paper shows through. Some children prefer a colorful mosaic, while others naturally create patterns. Both look beautiful.
- Allow the glue to dry completely. The flowers become more secure as the glue dries, so remind little hands not to keep touching them.
- Decorate the rest of the card with drawings, stickers, or colorful borders. Many preschoolers love adding sunshine, butterflies, or tiny hearts around the flower design.
- Write a sweet message inside. Younger children can dictate their words while an adult writes them down. Seeing their own message inside makes the gift feel even more special.
Pro-Tip / Teacher’s Note: Place a heavy book over freshly pressed flowers for several days before crafting. Flat flowers are much easier for little hands to glue onto paper.
2. Flower Petal Handprint Keepsake Canvas
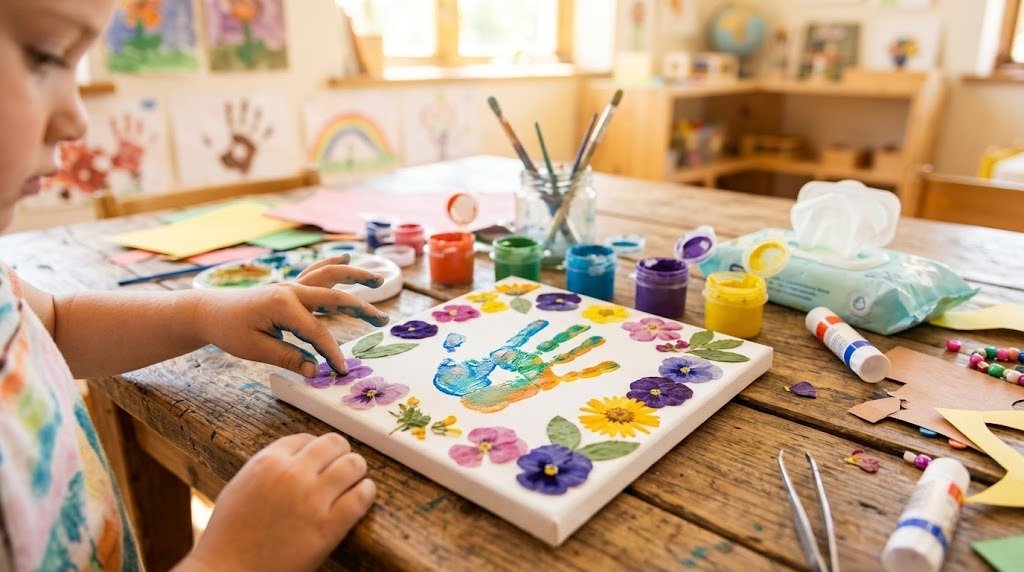
Handprint crafts have always been classroom favorites because they capture a moment in time. Adding edible flower petals turns an ordinary handprint into a beautiful Mother’s Day keepsake Grandma will treasure.
Skill Developed: Sensory exploration, fine motor control, creativity, and color recognition.
Materials Needed:
- Small canvas or thick cardstock
- Washable acrylic or tempera paint
- Paintbrush
- Pressed edible flower petals
- Non-toxic glue
- Paper plate
- Permanent marker (adult use)
- Baby wipes or damp towel
Step-by-Step Instructions:
- Pour a small amount of washable paint onto a paper plate. One color creates a classic keepsake, while two blended colors add extra charm.
- Paint the child’s palm evenly with a brush instead of dipping the hand into paint. This gives better coverage and avoids large paint blobs.
- Press the hand firmly onto the canvas. Count to three before lifting the hand straight up to create a clean print.
- Wash little hands immediately. I’ve found this keeps children from accidentally decorating the furniture before the paint dries.
- Allow the handprint to dry completely before adding flower decorations.
- Glue pressed flower petals around the handprint to create a blooming floral wreath. Children enjoy choosing where each petal belongs.
- Write “Happy Mother’s Day, Grandma” along with the child’s name and the year. Years later, families often say the date becomes one of their favorite details.
Pro-Tip / Teacher’s Note: Keep baby wipes nearby throughout the activity. Quick cleanups help prevent colorful fingerprints from appearing everywhere else.
3. Lavender Cupcake Liner Flower Bouquet
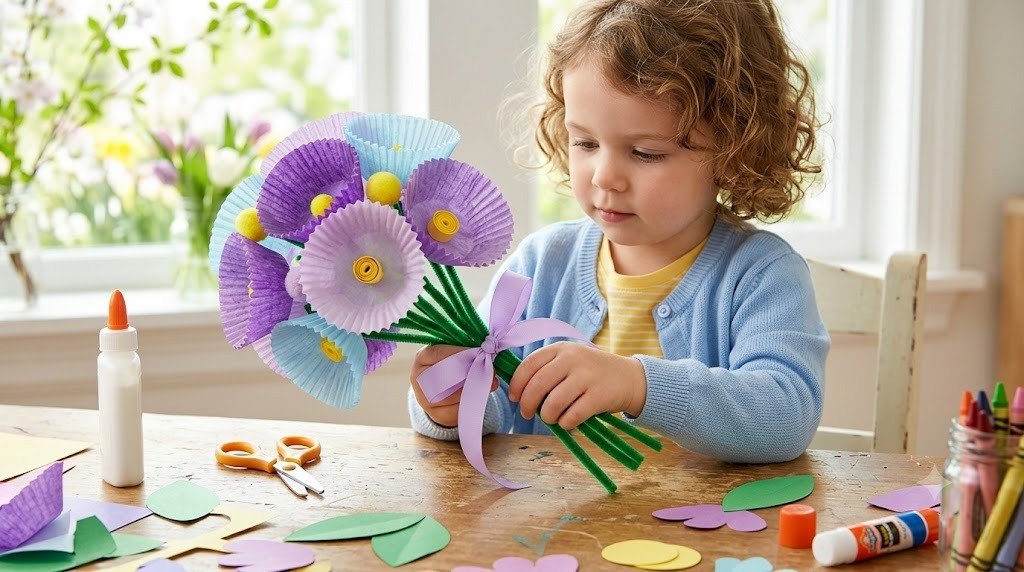
Cupcake liners are inexpensive, colorful, and perfect for preschool crafts. Combined with lavender-inspired colors, they become cheerful flowers that never wilt.
Skill Developed: Folding skills, hand strength, color matching, and creative expression.
Materials Needed:
- Purple and pastel cupcake liners
- Green pipe cleaners
- Green construction paper
- Non-toxic glue
- Safety scissors
- Yellow pom-poms or paper circles
- Tape
Step-by-Step Instructions:
- Flatten each cupcake liner gently with little hands. Children often enjoy comparing the different colors before choosing their favorites.
- Layer two cupcake liners together to make each flower look fuller and fluffier.
- Glue a yellow pom-pom or paper circle into the center of every flower.
- Attach a green pipe cleaner to the back using tape or glue. This becomes the flower stem.
- Cut simple leaves from green construction paper. Older preschoolers can practice safe scissor skills, while younger children may need pre-cut leaves.
- Glue the leaves onto each stem and gently bend them outward for a natural look.
- Gather several flowers together into a bouquet and wrap the stems with ribbon, yarn, or another pipe cleaner.
- Add a handmade gift tag with Grandma’s name to finish the bouquet.
Pro-Tip / Teacher’s Note: Let children mix different liner colors instead of matching them perfectly. The brightest bouquets usually come from the most creative combinations.
4. Chamomile Sunshine Paper Plate Wreath
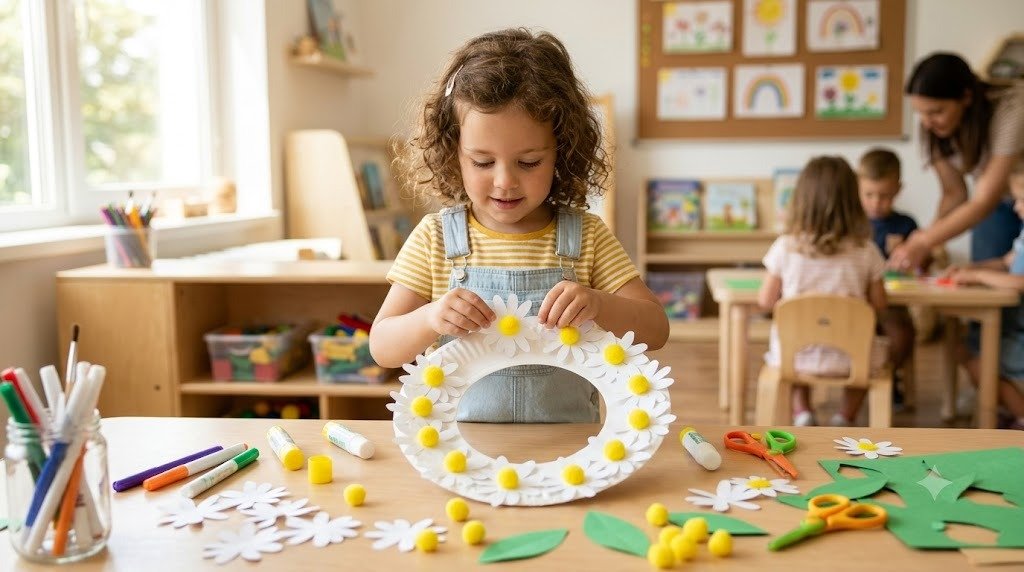
Chamomile flowers are small, cheerful, and full of sunshine, making them wonderful inspiration for a Mother’s Day wreath. This project looks impressive but is surprisingly simple for preschoolers.
Skill Developed: Scissor practice, spatial awareness, fine motor coordination, and patience.
Materials Needed:
- Paper plate
- White construction paper
- Yellow construction paper
- Green cardstock
- Non-toxic glue
- Child-safe scissors
- Ribbon or yarn
- Washable crayons or markers
Step-by-Step Instructions:
- Cut the center from a paper plate to create a large wreath shape. Adults should complete this step before younger children begin.
- Cut white flower petals from construction paper. For large groups, I usually prepare petal templates ahead of time so children can focus on decorating.
- Cut yellow circles for the flower centers and glue them onto the petals to create simple chamomile flowers.
- Glue the flowers all around the paper plate wreath, overlapping them slightly so the wreath looks full.
- Add green paper leaves between the flowers to create contrast and make the wreath appear more natural.
- Decorate any empty spaces with tiny hearts, dots, or cheerful drawings using washable markers.
- Punch a hole at the top and thread ribbon or yarn through it to create a hanging loop.
- Write “We Love You, Grandma!” across the bottom or on a small paper tag attached to the ribbon.
Pro-Tip / Teacher’s Note: Don’t worry if every flower points in a different direction. Preschool wreaths always look more charming when they’re a little wonderfully imperfect.
5. Rose Petal Suncatcher Window Decoration
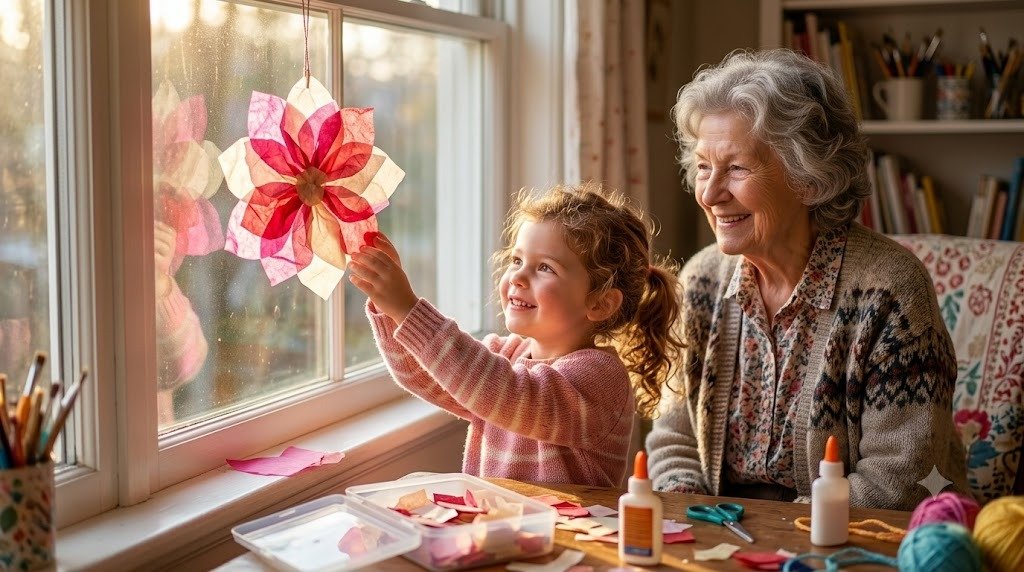
A colorful suncatcher is one of those crafts that makes children stop and admire their own work. When the sunlight shines through the tissue paper “rose petals,” the window glows with beautiful colors that Grandma can enjoy every day.
Skill Developed: Fine motor skills, color recognition, hand-eye coordination, and creative planning.
Materials Needed:
- Clear contact paper
- Pink, red, and cream tissue paper
- Black construction paper
- Child-safe scissors
- Non-toxic glue
- Hole punch
- Ribbon or string
- Pencil
Step-by-Step Instructions:
- Cut a large flower shape from black construction paper. An adult can prepare the outline for younger children, while older preschoolers can help cut simple shapes.
- Remove the backing from one sheet of contact paper and place it sticky side up on the table. Tape the corners down so it doesn’t curl while children work.
- Tear tissue paper into small pieces instead of cutting them. Tearing paper is excellent for strengthening little fingers, and children usually enjoy making colorful piles.
- Place the tissue paper pieces onto the sticky contact paper, overlapping the colors slightly to create a stained-glass effect.
- Lay the flower frame over the colorful tissue paper once enough of the sticky surface is covered.
- Seal everything by placing a second sheet of contact paper on top. Smooth it gently with your hands to remove air bubbles.
- Trim around the flower leaving a small clear border so the edges stay sealed.
- Punch a hole near the top and thread ribbon through it.
- Hang the finished flower in a sunny window where the colors can shine beautifully throughout the day.
Pro-Tip / Teacher’s Note: Tissue paper tends to stick to little fingers because of static electricity. I keep a slightly damp cloth nearby so children can quickly wipe their hands if they become frustrated.
6. Violet Fingerprint Flower Pot
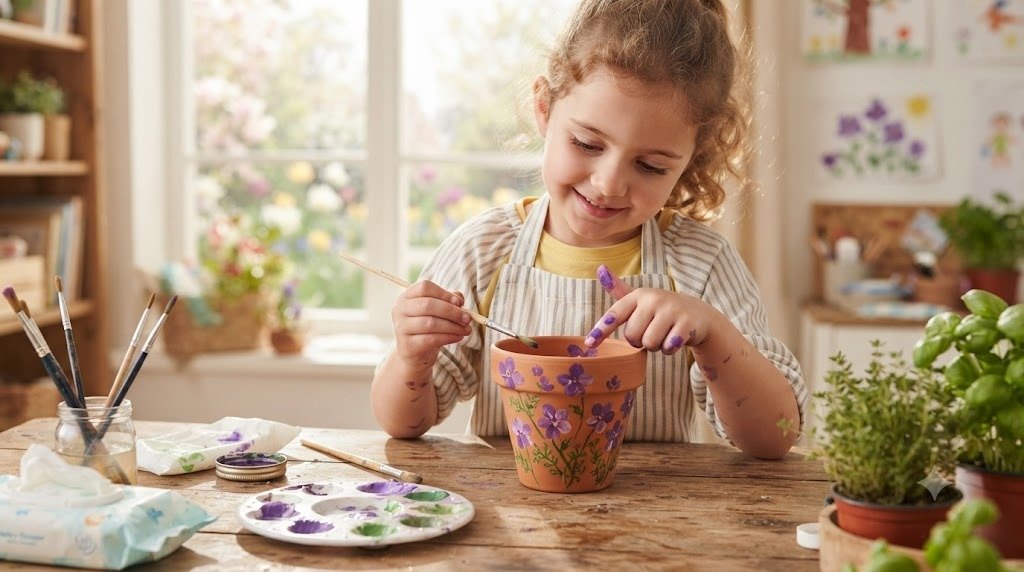
This sweet flower pot becomes even more meaningful because Grandma can use it for herbs or fresh flowers long after Mother’s Day has passed. Tiny fingerprint flowers make every pot completely one of a kind.
Skill Developed: Finger control, sensory exploration, creativity, and color mixing.
Materials Needed:
- Small terracotta flower pot
- Washable acrylic paint
- Paint palette or paper plate
- Small paintbrush
- Green paint marker or paintbrush
- Clear non-toxic sealer (adult use, optional)
- Potting soil and small herb (optional)
Step-by-Step Instructions:
- Wipe the flower pot with a dry cloth to remove dust before painting.
- Choose two or three paint colors inspired by violets, such as purple, lavender, and white.
- Dip one fingertip lightly into the paint and press it onto the flower pot to create flower petals. Four or five fingerprints placed close together make a lovely blossom.
- Repeat around the pot until several flowers appear. Children naturally enjoy changing colors as they go.
- Allow the fingerprints to dry completely before adding details.
- Paint green stems and leaves beneath each flower using a thin paintbrush or paint marker.
- Write “Love You, Grandma!” with the child’s name and date on the pot if space allows.
- Let the entire pot dry overnight. If desired, an adult can apply a clear sealer to help protect the artwork.
- Plant a small herb or flowering plant inside the pot before giving it as a gift.
Pro-Tip / Teacher’s Note: Fingerprint flowers don’t need to look identical. Some of my favorite classroom flower pots had tiny, uneven blossoms that showed each child’s unique style.
7. Calendula Tissue Paper Flower Basket
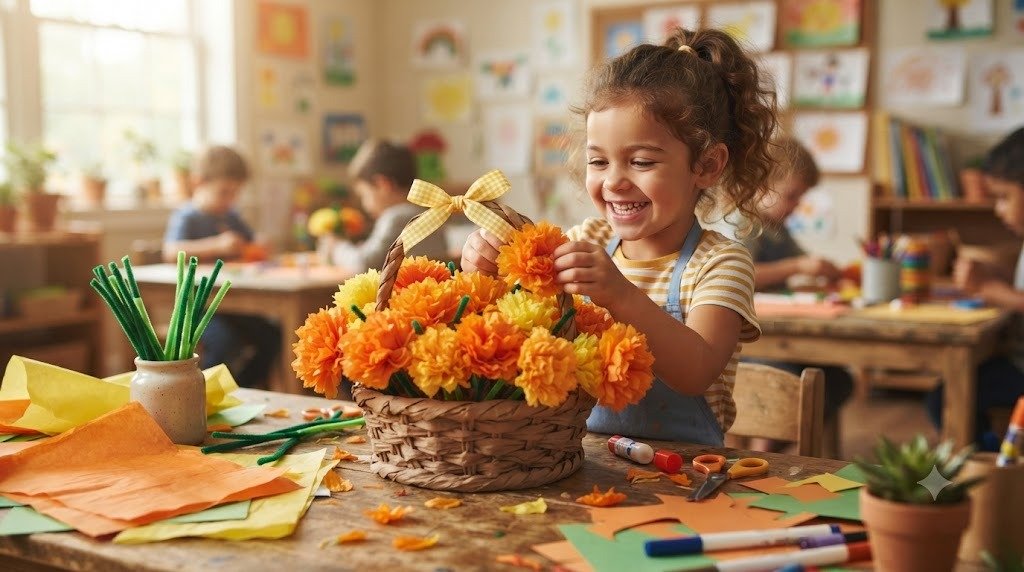
Bright orange and yellow calendula flowers inspire this cheerful basket filled with handmade blooms. Preschoolers love carrying their finished baskets around before proudly handing them to Grandma.
Skill Developed: Folding, gluing, bilateral coordination, and imaginative play.
Materials Needed:
- Brown construction paper
- Orange and yellow tissue paper
- Green pipe cleaners
- Craft glue
- Stapler (adult use)
- Child-safe scissors
- Ribbon (optional)
Step-by-Step Instructions:
- Fold brown construction paper into a simple basket shape. Adults can staple the sides securely while children hold the paper in place.
- Attach a paper handle across the top of the basket using staples or strong glue.
- Cut tissue paper into medium-sized squares.
- Scrunch each square gently into a loose ball. This simple action is wonderful for strengthening little hands and fingers.
- Glue several scrunched pieces together to create fluffy calendula flowers.
- Attach green pipe cleaners to the flowers as stems.
- Place the finished flowers inside the basket until it looks full and overflowing.
- Tie a ribbon around the handle if you’d like an extra festive touch.
- Add a handwritten gift tag saying, “Picked with Love for Grandma.”
Pro-Tip / Teacher’s Note: Let children make more flowers than they think they’ll need. Extra blooms are perfect for decorating the classroom or taking home.
8. Edible Flower Bookmark with Laminated Artwork
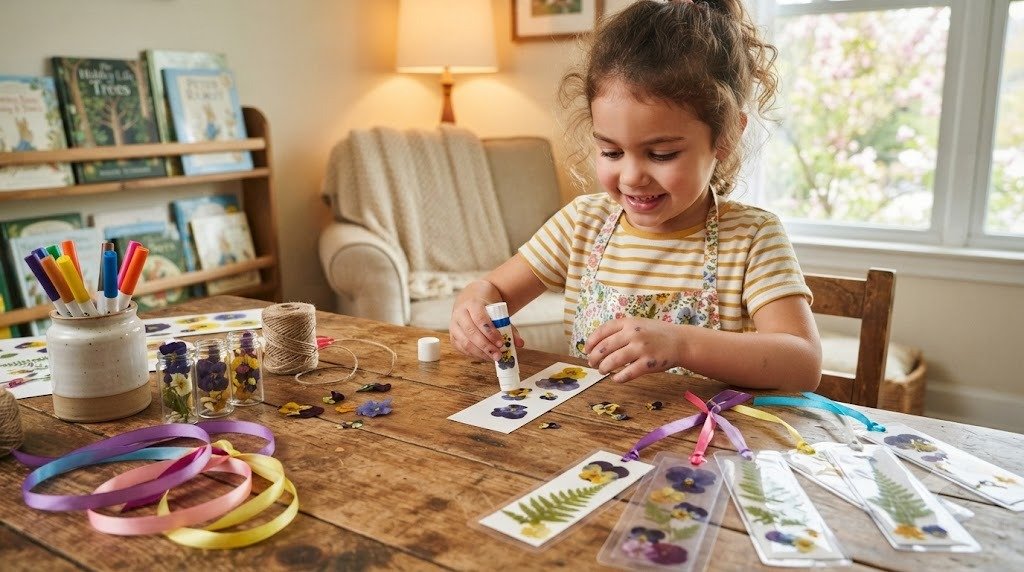
For grandmas who love reading, a handmade bookmark is both thoughtful and practical. Children are always excited knowing their artwork might be tucked inside Grandma’s favorite book.
Skill Developed: Fine motor skills, design planning, creativity, and early literacy appreciation.
Materials Needed:
- White cardstock
- Pressed edible flowers
- Non-toxic glue
- Markers
- Clear self-laminating sheets or laminating pouches
- Hole punch
- Ribbon or yarn
- Safety scissors
Step-by-Step Instructions:
- Cut cardstock into long bookmark-sized strips. Larger bookmarks are easier for preschoolers to decorate.
- Arrange the pressed flowers on the bookmark before gluing. Encourage children to experiment with different layouts first.
- Glue each flower carefully using only a tiny amount of glue. Too much glue may wrinkle delicate petals.
- Draw small hearts, butterflies, or smiling suns around the flowers with washable markers.
- Write a short message like “Grandma, You Make Every Story Bloom” or simply sign the child’s name.
- Allow everything to dry completely before laminating.
- Laminate the bookmark using self-adhesive laminating sheets or a laminating machine operated by an adult.
- Trim the edges neatly, leaving a narrow laminated border around the artwork.
- Punch a hole at the top and tie a colorful ribbon through it to complete the keepsake.
Pro-Tip / Teacher’s Note: If laminating isn’t available, clear contact paper works surprisingly well and helps protect the bookmark from everyday use.
9. Nasturtium Garden Collage Frame
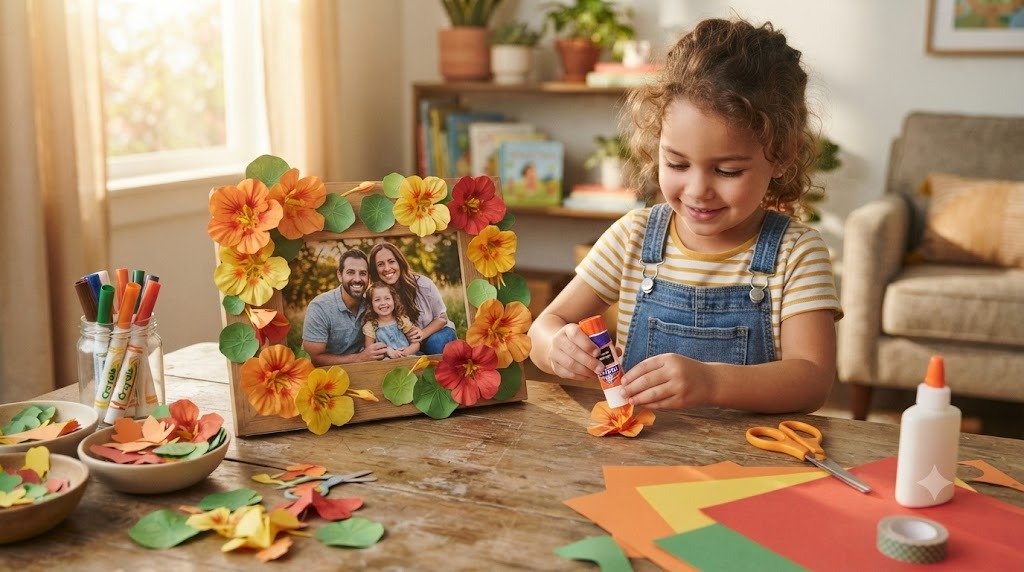
Nasturtiums are known for their cheerful orange, yellow, and red blooms, making them wonderful inspiration for a colorful picture frame. This craft lets children create a handmade gift that Grandma can display with a favorite family photo.
Skill Developed: Fine motor skills, color recognition, creativity, and spatial awareness.
Materials Needed:
- Wooden or cardboard picture frame
- Orange, yellow, and red construction paper
- Green cardstock
- Child-safe scissors
- Non-toxic school glue
- Washable markers
- Small family photo (optional)
Step-by-Step Instructions:
- Choose a frame made from unfinished wood or sturdy cardboard. If you’re working with a classroom, cardboard frames are inexpensive and easy to prepare ahead of time.
- Cut flower shapes from orange, yellow, and red construction paper. Younger children can use pre-drawn templates, while older preschoolers may enjoy cutting their own simple flowers.
- Cut several green leaves in different sizes. Real nasturtium leaves are almost round, so don’t worry if they aren’t perfectly shaped.
- Arrange the flowers and leaves around the frame before gluing. Children often enjoy moving pieces around until they like the design.
- Glue each piece securely onto the frame, slightly overlapping flowers to create a full garden effect.
- Add extra details with washable markers, such as tiny ladybugs, butterflies, hearts, or sunshine.
- Let the frame dry completely before inserting a favorite family photo.
- Write the child’s name and the year on the back so Grandma will always remember when it was made.
Pro-Tip / Teacher’s Note: I always keep a few extra paper flowers on the table. If one tears or gets too much glue, children can simply swap it out instead of getting discouraged.
10. Dandelion Wish Jar Decoration
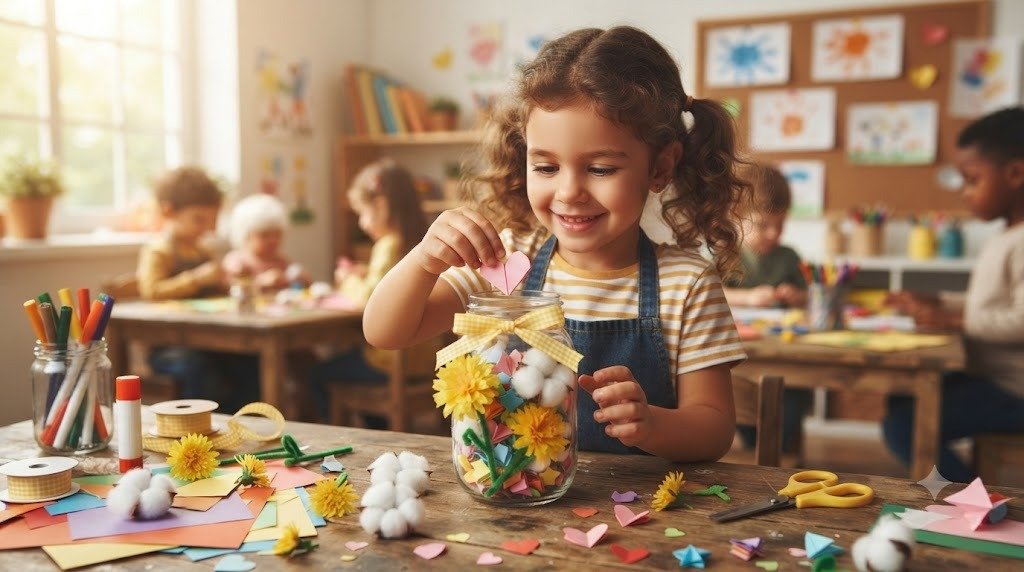
Every preschool class I’ve taught has loved making wishes while blowing pretend dandelions. This keepsake jar captures that magical feeling and reminds Grandma that she is loved every single day.
Skill Developed: Creative thinking, fine motor skills, language development, and emotional expression.
Materials Needed:
- Small glass or plastic jar
- Yellow and white construction paper
- Green paper
- Non-toxic glue
- Cotton balls
- Ribbon or twine
- Washable markers
- Small paper slips
Step-by-Step Instructions:
- Clean and dry the jar before decorating. Plastic jars work especially well for younger children because they won’t break if dropped.
- Cut yellow paper flowers inspired by dandelion blooms and glue them around the outside of the jar.
- Pull apart cotton balls gently to create fluffy dandelion seed heads. Children usually love this soft sensory activity.
- Glue the cotton carefully above green paper stems to complete the flowers.
- Decorate the jar with tiny hearts, smiling bees, butterflies, or colorful dots using washable markers.
- Cut small slips of paper and invite children to share reasons they love Grandma. Adults can write their words if needed.
- Fold each note and place it inside the jar.
- Tie a ribbon or twine around the lid to finish the keepsake.
- Encourage Grandma to open one loving note whenever she needs an extra smile.
Pro-Tip / Teacher’s Note: Some children may only say a few simple words like “Grandma hugs me.” Those heartfelt little sentences are often the sweetest part of the gift.
11. Edible Flower Tea Cup Mother’s Day Gift
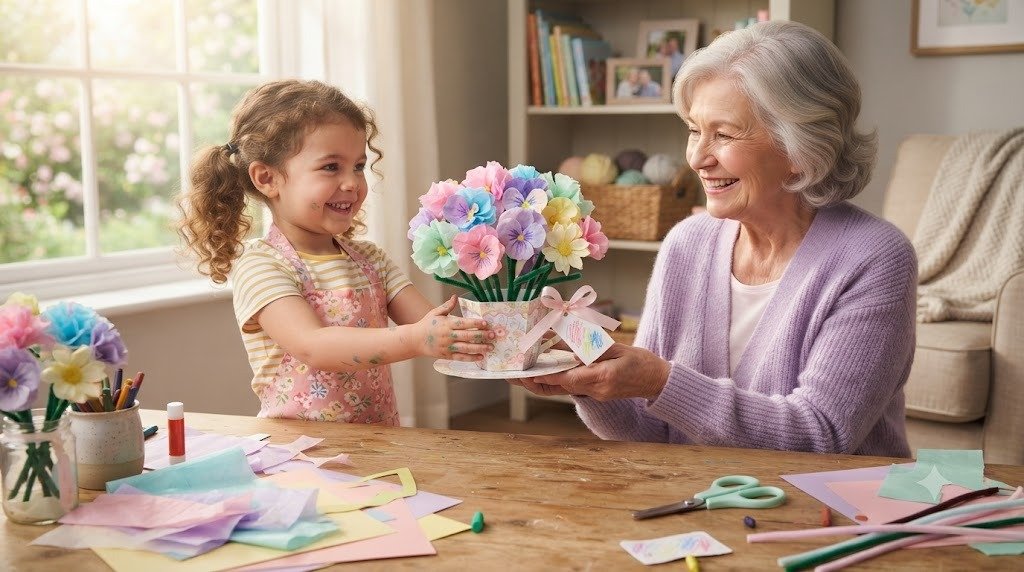
This pretend tea cup arrangement is one of my favorite classroom projects because it looks surprisingly elegant while using simple craft supplies. Children love pretending they’re serving Grandma a special Mother’s Day tea party.
Skill Developed: Imaginative play, hand-eye coordination, fine motor skills, and creative problem-solving.
Materials Needed:
- Paper or plastic tea cup
- Pink, purple, yellow, and white tissue paper
- Green pipe cleaners
- Craft foam or construction paper
- Non-toxic glue
- Child-safe scissors
- Ribbon
- Gift tag
Step-by-Step Instructions:
- Decorate the tea cup with hearts, dots, or simple flower drawings using washable markers.
- Create tissue paper flowers by stacking several tissue squares together, pinching the center, and fluffing the layers gently.
- Attach green pipe cleaners to each flower to form sturdy stems.
- Cut green paper leaves and glue them onto the stems.
- Fill the tea cup with crumpled tissue paper to create a base that will hold the flowers upright.
- Arrange the flowers inside the cup, adjusting the heights until the bouquet looks full and balanced.
- Tie a ribbon around the handle for an extra decorative touch.
- Attach a handmade gift tag that says something like, “Happy Mother’s Day, Grandma! Love Always.”
- Present the finished gift with a hug and let the child explain how they made it. Those little stories often become Grandma’s favorite part of the present.
Pro-Tip / Teacher’s Note: Let children choose their own flower colors instead of copying an example. Their unique color combinations make every bouquet feel extra personal.
Conclusion
The best Mother’s Day crafts aren’t the ones that look store-bought—they’re the ones filled with little fingerprints, crooked petals, and big smiles. After spending years crafting with preschoolers, I’ve learned that children are far more interested in making something with love than making it perfect.
These edible flower-inspired crafts give children a chance to practice important developmental skills while creating gifts that Grandma will truly treasure. Expect a little glitter on the floor, plenty of gluey fingers, and flowers that may lean in every direction. That’s part of the magic. Years from now, Grandma probably won’t remember whether every petal was perfectly glued, but she’ll remember that a small pair of hands made something just for her.
Happy crafting, and Happy Mother’s Day to every wonderful Grandma who proudly displays these handmade treasures!